Welcome to “Knit Wiser,” where the art of knitting meets clever innovation! Whether you’re a seasoned knitter or just starting out with your first pair of needles, this article is your treasure trove of tips and tricks to transform your knitting experience. From DIY tools to ingenious ways to manage your yarn, we’ve scoured the knitting universe to bring you 20+ of the most resourceful hacks that promise to make your knitting smoother, more organized, and even more enjoyable for beginners and advanced knitters.
Imagine repurposing everyday household items into knitting essentials or discovering simple tweaks to common knitting challenges – that’s what you’ll find here. These hacks are not just about saving money; they’re about enhancing your creativity and efficiency, letting you focus more on the joy of knitting and less on the small annoyances. So grab your needles, and let’s dive into a world where creativity intertwines with practicality, making every stitch a delightful journey!
DIY Ball Winder for Effortless Yarn Management
Skip the expense of a commercial ball winder and opt for a homemade version using an empty toilet paper roll. This simple, cost-effective solution is perfect for creating center-pull balls of yarn, which are ideal for knitting without tangles.
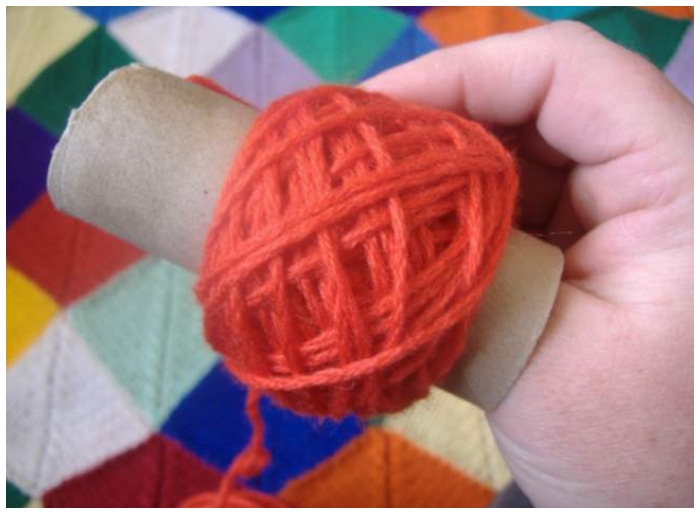
To use, start by securing the end of the yarn on the roll and wind evenly, building layers until you have a neatly wound ball. This DIY approach saves money and adds a personal touch to your knitting setup, making the yarn management process both efficient and satisfying.
Wine Corks as Point Protectors
Utilize wine corks as an innovative and eco-friendly solution for protecting the points of your knitting needles. Simply slide a cork onto the end of each needle to prevent stitches from slipping off, especially when you’re on the go or storing your project.
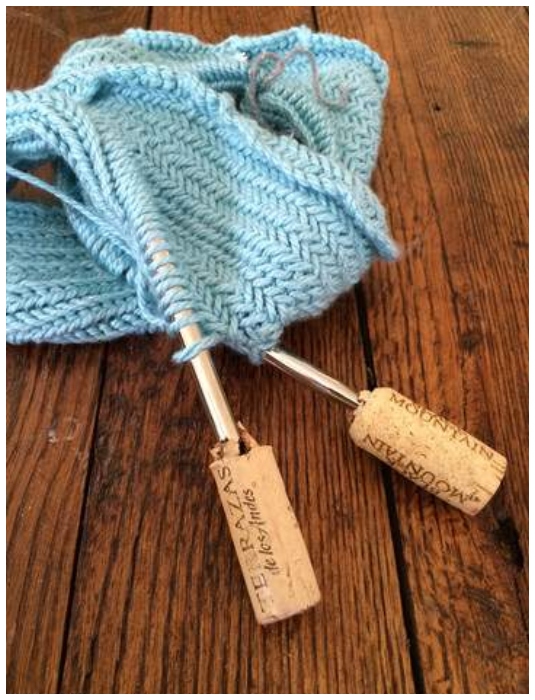
This hack is particularly useful for those who knit with double-pointed needles or circular needles with detachable tips. Wine corks serve as effective point protectors and add a unique, personalized flair to your knitting tools, blending functionality with a touch of creativity.
Straightening Circular Needles with Ease
If your new circular needles are kinking and making your knitting experience less enjoyable, there’s a quick fix. Simply dip the cord part of the needle into hot water for a few seconds, then gently pull it straight. This softens the plastic and allows it to be reshaped, eliminating annoying kinks that interfere with your knitting rhythm.
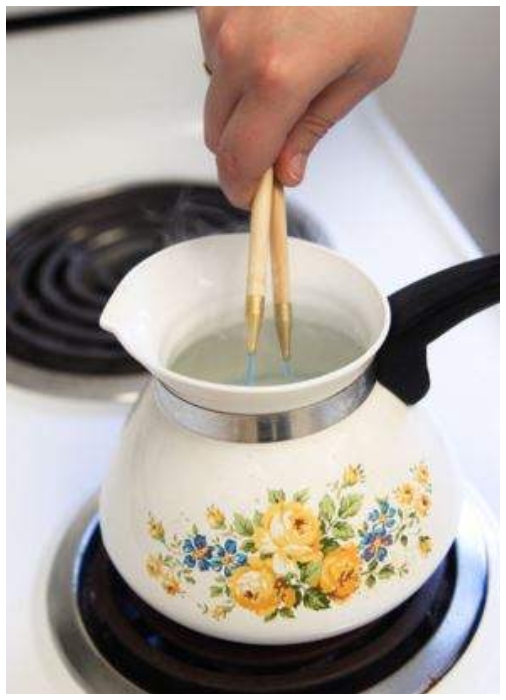
Once straightened, the needle should maintain its new shape, making your knitting smoother and more enjoyable. This simple yet effective method ensures that your circular needles are always ready for your next project.
Budget-Friendly Yarn Holder
Create a highly functional yarn holder using a chunky knitting needle and a cardboard box. Piercing the needle through the top of the box allows you to feed your yarn through, preventing it from rolling around and becoming tangled as you knit.
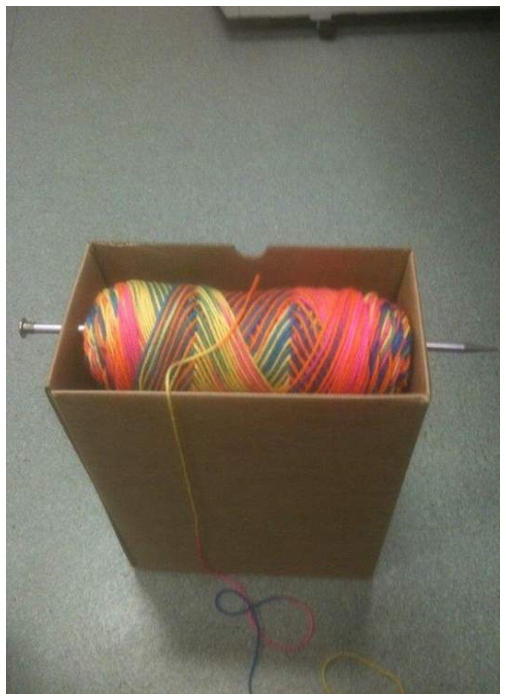
This DIY yarn holder is economical and customizable to fit the size of your yarn skeins. It’s a practical solution for keeping your yarn secure and easily accessible, enhancing your knitting experience without needing expensive accessories.
Cotton Bud Cables as Handy Tools
The soft ends of a cotton bud can be repurposed as an effective and lightweight cable needle. This hack is handy for those delicate cable patterns where a weightier needle might distort the stitches. Keep a few cotton buds in your crafting bag when holding stitches at the back or front of your work.
Their small size and lightweight nature make them an excellent alternative to traditional cable needles, offering convenience and functionality in your knitting projects.
Repurposed Tic Tac Boxes for Notions Storage
Plastic Tic Tac boxes are perfect for storing small knitting notions like tapestry needles and stitch markers. These compact containers fit easily into any knitting bag, keeping your small essentials organized and easily accessible.
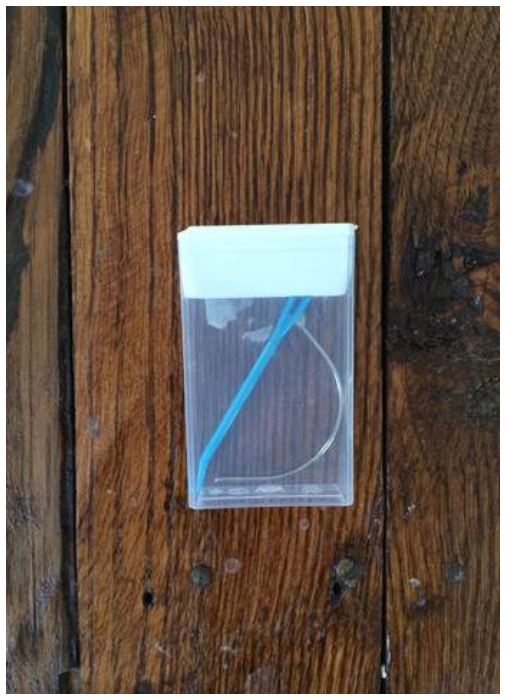
This solution not only recycles commonly discarded items but also helps prevent the frustration of searching for tiny tools amidst your yarn and projects. By using Tic Tac boxes, you can ensure that all your knitting notions are in one place, ready for when you need them, making your crafting more organized and enjoyable.
Pencil Grips For Hooks
For those who find ergonomic crochet hooks expensive, pencil grips can be an excellent, budget-friendly alternative. They offer similar comfort and support to expensive hooks, preventing hand cramps and fatigue. This adaptation can lead to increased speed and efficiency in your crochet work.
If you’re hesitant to invest in a complete set of ergonomic hooks, try attaching a pencil grip to your most frequently used hook size as a test run. The improvement in comfort and control might just convince you to expand this practice to your entire hook collection.
Use Rings For Holding Granny Squares Together
When creating numerous granny squares for projects like afghans, bags, or garments, keeping them organized can become daunting. Using rings to bundle these squares is a creative and highly effective solution. By grouping 20-25 squares per ring, you can easily manage large quantities, reducing the need for repeated counting and ensuring that your squares remain neatly stacked and untangled.
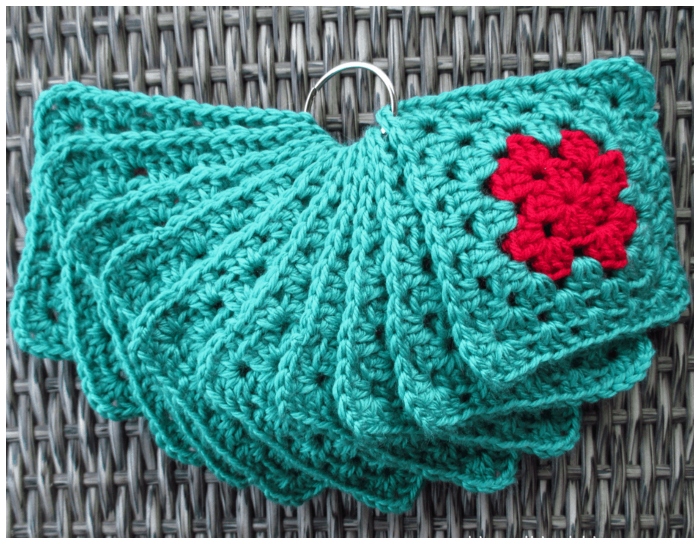
This method streamlines the assembly process and adds a layer of organization to your crafting space. It’s an excellent way to keep track of your progress, especially in projects requiring a large number of squares, and it simplifies the final assembly, making it less overwhelming and more enjoyable.
Use a Lifeline
The concept of a lifeline is a lifesaver in knitting, especially when tackling complex patterns or when you’re still honing your skills. You create a safety net by threading a piece of waste yarn through the stitches on your needle at regular intervals.’ If you encounter a mistake, you can easily return your work to the lifeline without losing all your progress.
It’s particularly beneficial for patterns with intricate designs or beginners prone to errors. The key is to place the lifeline in a row where you are confident the pattern is correct and then continue knitting. If a mistake is made, the lifeline ensures you have a secure point to return to, reducing stress and making the knitting process more forgiving and enjoyable.
Mastering the “Bird’s Eye” Stitch
The “Bird’s Eye” stitch, also known as the “Double Eyelet,” is a timeless pattern that adds a delicate, lace-like texture to your knitting projects. Perfect for lightweight summer garments or elegant shawls, this technique creates eyelets in a unique pattern resembling a flock of birds in flight. The key to mastering this stitch lies in the precision of yarn overs and strategic decreases. As you work, ensure that your yarnovers are even and the decreases are aligned to maintain the integrity of the pattern.
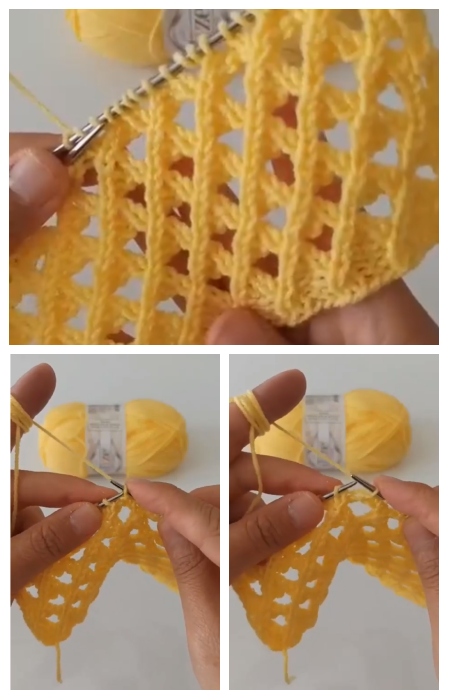
Step-by-step guide: The “Double Eyelet” transforms your knitwear into a canvas of texture and sophistication. To begin, cast on a multiple of four stitches plus one for the foundation row. The pattern typically unfolds over a four-row repeat, where the eyelets form on the right side and the wrong side rows serve as a purl backdrop to highlight the design. Experiment with different yarn weights and colors to see how each variation brings a new dimension to the “Bird’s Eye” pattern. Blocking is your ally in lace knitting, helping open the eyelets and showcase your handiwork.
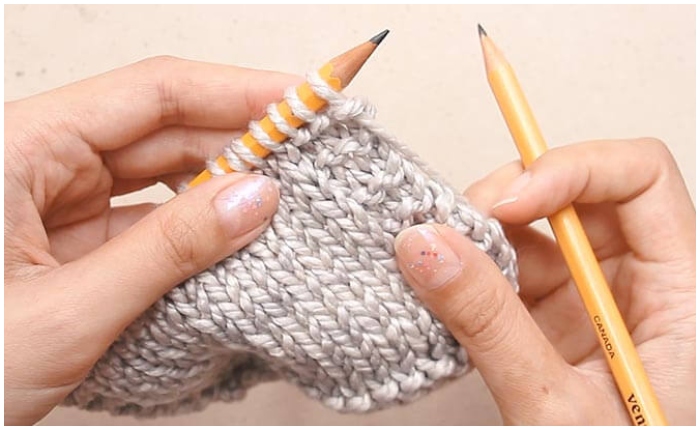
Screwdriver Knitting Needle Hack
Knitters are no strangers to improvisation, and the image showcasing screwdrivers as knitting needles epitomizes this spirit. Whether you’re in a pinch or seeking a DIY approach, converting screwdrivers into knitting needles can be a game-changer. The sturdy handle provides a comfortable grip, which is especially beneficial for those with hand fatigue or arthritis. The metal shaft mimics the slick surface of many traditional needles, allowing for smooth stitches and rapid knitting.
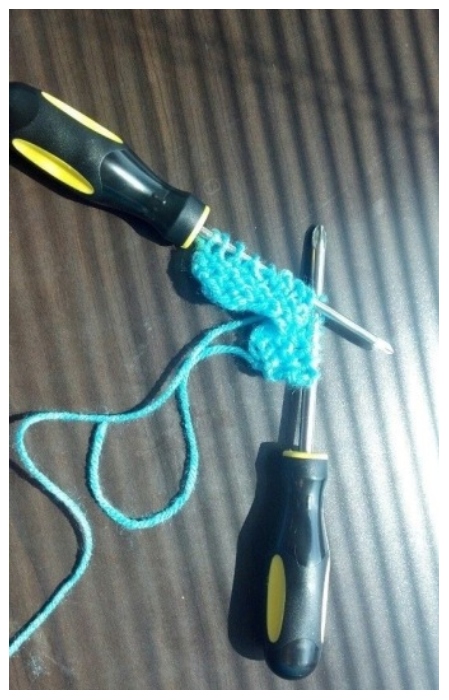
Select screwdrivers with a shaft diameter that matches your desired gauge to adopt this hack. You may use a grinder or a metal file to soften any rough edges and create a pointed tip akin to that of a standard needle. This method not only recycles tools you already have but also adds a personalized touch to your knitting kit. Remember, the weight and balance of a screwdriver are different from regular needles, so it might take some getting used to.
DIY Yarn Storage Solution – Stacked PVC Pipes
Transform the way you store your yarn with this creative and space-saving solution. Utilizing PVC pipes to create a modular shelving unit offers a visually stunning and highly functional way to organize your yarn collection. By cutting thick PVC pipes into segments and stacking them on a sturdy wooden base, you create individual niches that protect your yarn and display it in an accessible and artistic fashion. The circular openings are perfect for sliding in balls of yarn, keeping them tangle-free and ready for your next project.
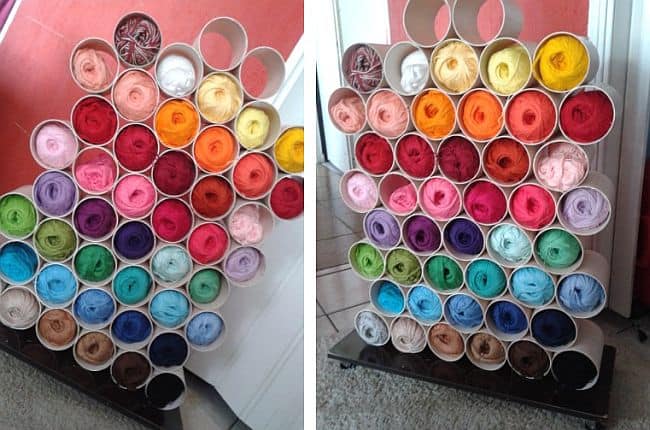
Step-by-step guide: 1. To start, measure the diameter of your yarn balls to determine the ideal width of the PVC pipes. 2. Cut the pipes into lengths that accommodate the full width of your yarn, ensuring a snug fit that prevents the yarn from collapsing into the tube. 3. Sand down any rough edges for a smooth finish. 4. Arrange the cut pipes onto a wooden base in a pattern that suits your space and aesthetic preference. You can secure them with strong adhesive or screws for added stability. 5. Once your PVC yarn shelf is assembled, fill each nook with a different color or type of yarn to create a functional piece of art to inspire your next knitting adventure.
DIY Knitter’s Utility Wristband
For those who prefer their knitting tools to be as mobile and handy as they are, the Knitter’s Utility Wristband is a revelation. The wristband in the image serves as a perfect inspiration. It’s essentially a crochet or knit band, fashioned to snugly wrap around your wrist, with special loops or clasps to hold essential knitting tools like stitch markers, crochet hooks, or cable needles. The beauty of this design lies in its simplicity and functionality, allowing for quick access to tools while working through complex patterns or when you’re on the move.
Step-by-step guide: To replicate this practical accessory, start with a sturdy yet comfortable yarn that can withstand regular wear and tear. Measure your wrist and create a band that fits snugly, accounting for the slight stretch of the yarn. Incorporate sturdy loops or clasps made from durable materials that can hold the weight of your tools without deforming. Add a secure closure system, such as a button, loop, or Velcro, to ensure the band stays in place as you move. Personalize your wristband with inspiring colors, or match it with your knitting bag for a coordinated look.
Yarn Skein Holder for Tangle-Free Crocheting
Say goodbye to the frustration of tangled yarn with this clever yarn skein holder. The ingenious design uses a common plastic jar or can to keep your yarn in place while you crochet or knit. Simply place your skein or ball of yarn inside the container, thread the end through a hole in the lid, and voila! You have a tangle-free yarn dispensing system. This method prevents knots and snags and protects your yarn from dust and pets.
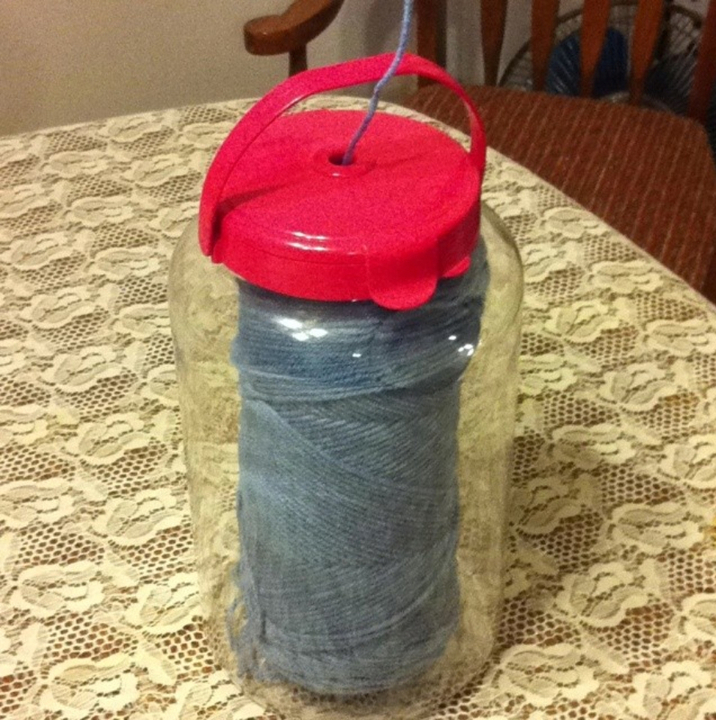
How to make it: Creating this holder is as easy as finding a plastic jar or can with a secure lid to accommodate your skein size. Drill or cut a small hole in the center of the lid, ensuring it’s just large enough for the yarn to pass through smoothly. If desired, sand the hole’s edges to prevent any catch or fray on your yarn. Place your yarn skein inside, pull the end through the hole, and secure the lid. The yarn will unfurl easily as you work, allowing you to focus on your stitches and not detangling.
Handcrafted Crochet Rose
The foundation of a crochet rose is a chain that will determine the size of the flower. Start with a slip knot and crochet a long chain to accommodate your desired petals. This chain acts as the spine for the petals you will crochet onto. Each petal is formed directly onto this chain, connecting them in a continuous strip. A chain of 50 to 60 stitches is usually sufficient for a standard-sized rose, but you can adjust the length for larger or smaller flowers.
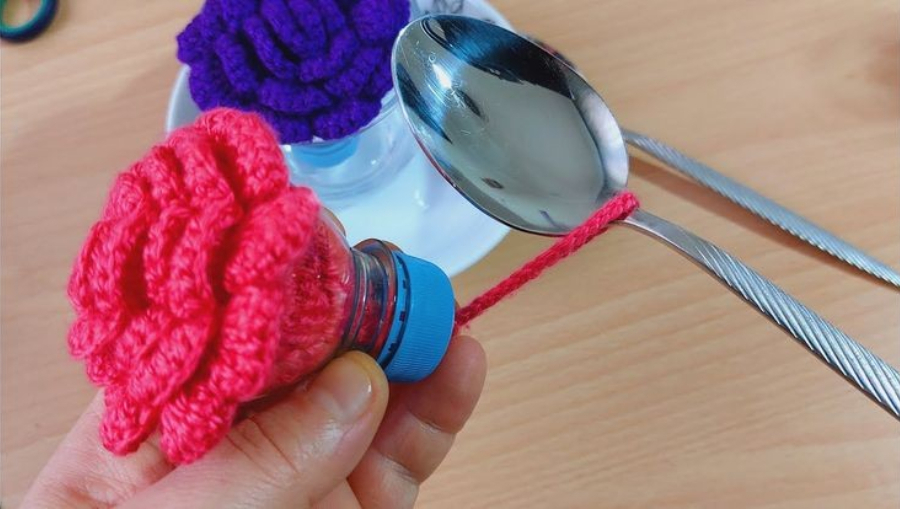
For the first petal, make a single crochet stitch into the second chain from the hook, half double crochet into the same chain, then work two double crochets into the next chain. Continue by making a half-double crochet and a single crochet into the following chain to complete your first petal. To start the next petal, skip one chain and repeat the sequence of stitches. As you progress, you can increase the number of double crochets in each petal for a fuller look. After you finish the last petal, fasten off the yarn, leaving a long tail for sewing. Roll the strip beginning with the first petal, and sew the base together to secure the flower’s shape.
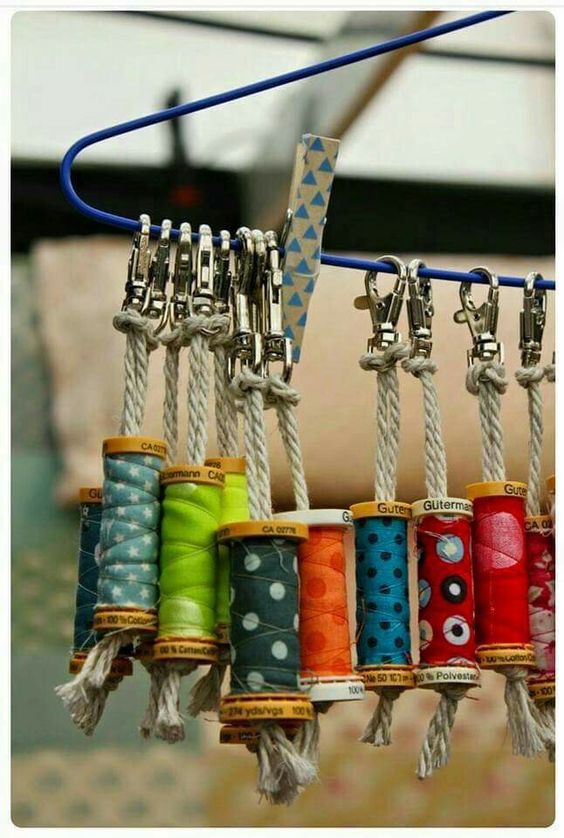
Knitting Spool Keychains
Transform empty thread spools into charming keychains with a touch of creativity. Select a piece of fabric that appeals to your style and wrap it around the spool’s body. Secure it with a colorful thread both for functional purposes and to add an extra flair of aesthetics.
Yarn Management System
Embrace the convenience of a mobile yarn management system featuring an adjustable garment rack paired with open-ended pants hangers. This ingenious setup might take up some space, yet its mobility is a game-changer, rolling discreetly into a corner when not in use. Its practicality rivals that of bulky storage options like large rubbermaids.
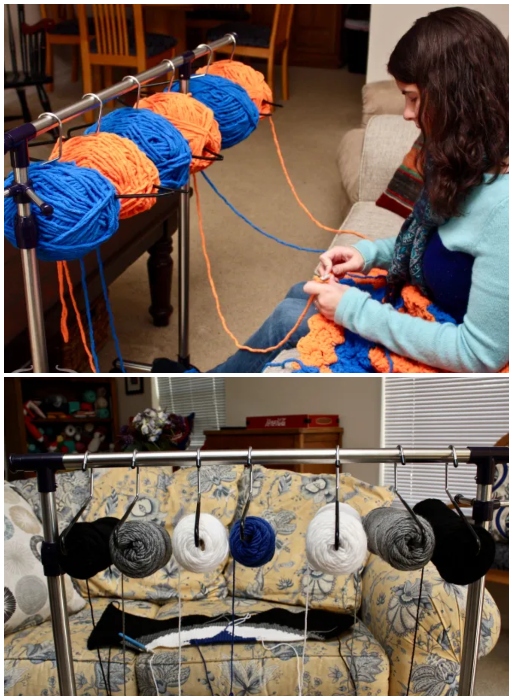
The key component is an adjustable-height garment rack, essential for positioning your yarn at the perfect level for comfortable knitting or crocheting. The system has proven its versatility across various projects, allowing yarn to unravel smoothly and eliminating the hassle of tugging at ends. The movable hangers simplify project rotation, preventing yarn entanglement and promoting a seamless crafting experience.
How to Knit Intarsia in the Round
To knit intarsia in the round using double-pointed needles, begin by weaving in a new yarn, color B, as you would normally or by using the Twist & Weave method, and knit according to your chart or until the end of the color block. Upon reaching the block’s end, turn your project to create a provisional join with the tail of the previous color, color A, by twisting it to form a loop. Purl one stitch in reverse, then enlarge the loop in color A for later use. Continue purling back to the start of the block, leaving the loop in color A. Upon reaching the end of the block, twist the loop with color A and continue purling the wrong side until you reach the provisional join’s opposite end. Before finalizing the color A block, untwist the yarns by pulling the alternate color through the loop.
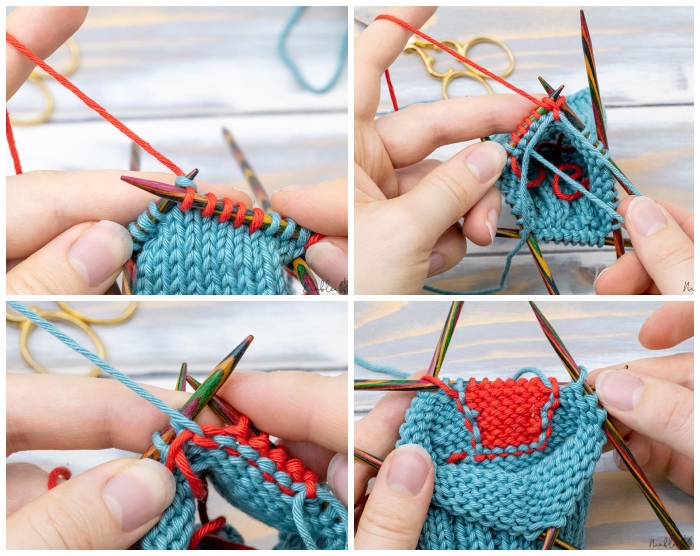
Complete the color A block, closing the provisional join by pulling the working yarn. Turn the work, create another provisional join with color B, and continue knitting back to the start of the color block in color A, ignoring the loop in color B. Pick up color B, twist the yarns, and knit across the color B block, ensuring to pass the bobbin in color A through the loop before the end. Once you reach the color block’s end, close the provisional join by pulling on the working yarn, turning the work, creating another provisional join, and continuing these steps until the desired length is reached. This process allows for a smooth, reversible intarsia fabric, ideal for patterns where both sides are visible.
Handy Stitch Gauge
Creating consistent stitches is key to a beautiful knitting project, but keeping track of stitch size can be a hassle. That’s where a DIY Stitch Gauge comes to the rescue! Here’s a simple way to make one using materials you can find at home. Materials Needed: A piece of thick cardboard or plastic sheet, A ruler, A marker, A craft knife or scissors, and A hole punch (optional).
Steps: 1. Cut a rectangular piece of cardboard or plastic, approximately 4×4 inches. 2. Using the ruler and marker, draw a 2-inch line near the edge of the rectangle. 3. Along the line, mark even intervals with your marker—these will represent different stitch sizes.
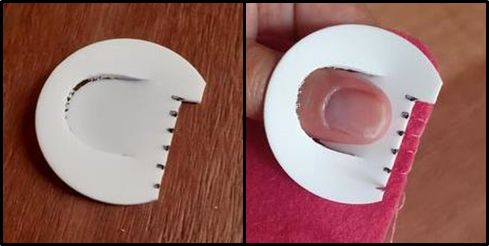
4. Carefully cut small notches at each interval with your craft knife or scissors. If you have a hole punch, you can use it to create a hole near the edge, which is useful for attaching the gauge to your knitting bag. 5. Place the gauge against your knitting work and slide the stitches into the notches to check their size.
This homemade stitch gauge is not only cost-effective but also customizable. You can add more lines with different intervals to cater to various yarn weights and knitting styles. Plus, it’s a creative way to ensure your knitting projects are consistent and professional-looking every time.
Portable Knitting Station
Transform any ordinary basket into a portable knitting station that you can take from room to room or even on the go. Materials Needed: A plastic basket with holes, Dowels or chopsticks, Yarn, Scissors, and Your current knitting project. Steps: 1. Select a basket with holes along the sides that are large enough to fit a dowel or chopstick through. 2. Slide the dowel or chopstick through two holes across from each other near the top of the basket.
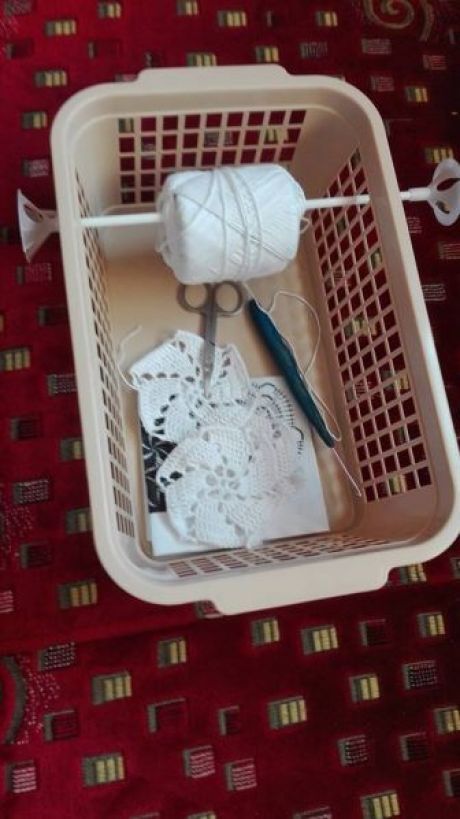
3. Place your yarn on the dowel or chopstick. This will allow the yarn to unravel smoothly as you knit, preventing tangles. 4. Store your knitting needles, scissors, and patterns in the basket so everything is in one place. 5. Now, you can easily carry your knitting project with you, keeping your yarn and tools neat and organized.
This portable knitting station is ideal for knitters who like to move around while working on their projects. It keeps your supplies in order and ready to use, whether you’re cozying up in front of the TV or enjoying the sun in your backyard.
How to Divide Serger Thread with an Egg Beater
If you’ve ever needed to divide serger thread but didn’t have a spooler handy, this knitting hack using a common kitchen tool will save the day! Materials Needed: A standard egg beater, Two empty thread spools, Scissors. Steps: 1. Take your serger thread and an empty thread spool. 2. Secure the end of the serger thread to one of the empty spools. You can do this by tucking it into the spool’s notch or using a piece of tape. 3. Attach the spool to one of the beaters of the egg beater, ensuring it’s snug and won’t slip.
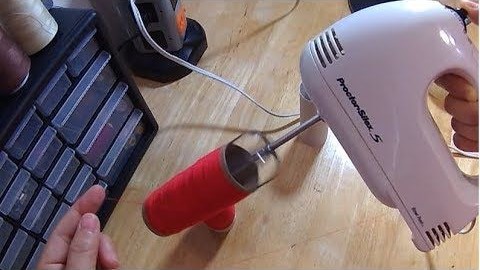
4. Hold the egg beater in one hand and the serger thread in the other, with the thread running through the beater’s loops. 5. Begin turning the egg beater manually, guiding the thread evenly onto the empty spool. The rotation of the beater will split the thread smoothly and evenly. 6. Once you’ve transferred the desired amount of thread, cut the thread and secure the end to the new spool.
This DIY method is perfect for knitters who need to manage their thread supply efficiently. Not only is it a resourceful use of household items, but it also adds a touch of ingenuity to your knitting toolkit.
Use a Row Counter
A row counter is an indispensable tool for knitters, particularly for patterns with complex repeats or extensive stitch counts. It eliminates the need for manual tracking, which can be error-prone and disruptive. With a row counter, you can effortlessly keep track of your progress, ensuring that each pattern repeat is accurate and consistent. Some advanced row counters come with memory functions, which are incredibly useful if you need to pause your project.
They allow you to save your current row to quickly resume your work without confusion or needing to recount. This tool is particularly valuable for intricate patterns, where losing your place can mean hours of backtracking. The row counter provides peace of mind and accuracy, making it a must-have in any knitter’s toolkit.
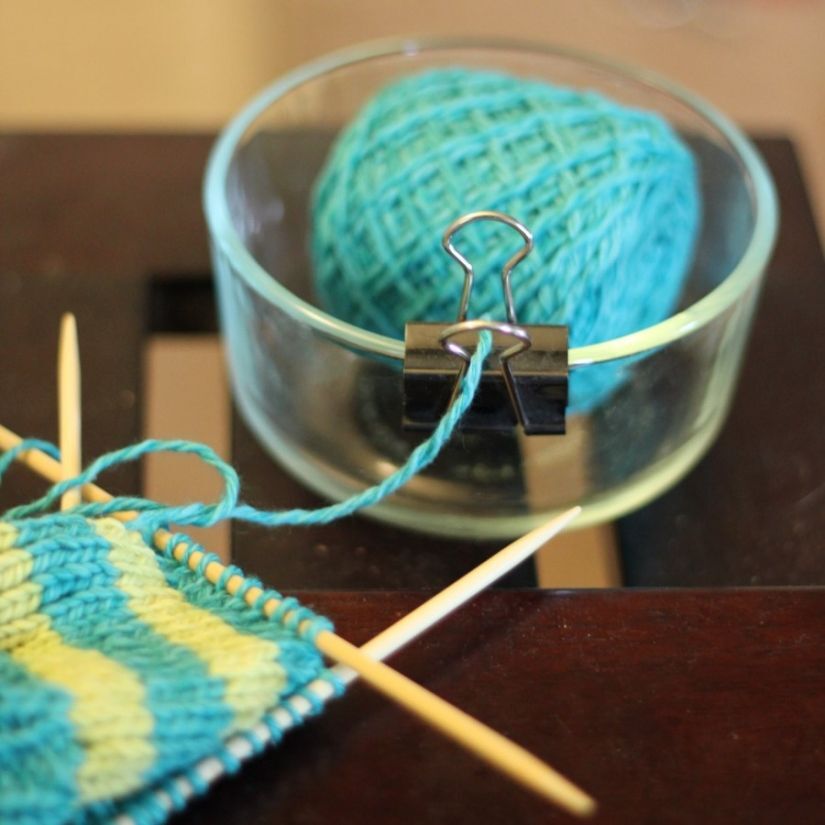
Tumbler Yarn Bowl
Transforming drink tumblers into yarn bowls is a creative reuse of household items and an effective solution for managing your yarn. A standard 24-ounce tumbler is typically the perfect size for a typical skein of yarn. The mouth of the tumbler acts as a guide, allowing the yarn to feed smoothly and consistently as you knit or crochet. This DIY yarn bowl prevents common issues such as yarn rolling away, tangling, or picking up dust and debris.
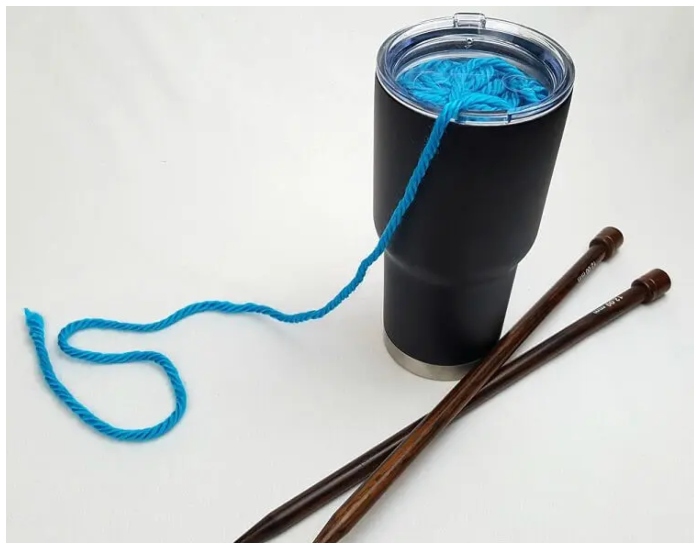
It’s a simple yet ingenious way to keep your yarn in place and your workspace tidy. Furthermore, using a tumbler as a yarn bowl is a cost-effective alternative to buying specialized knitting accessories, making it an ideal choice for knitters and crocheters looking to economize without compromising functionality.
Age-Old Wisdom
In the realm of knitting, there’s a treasure trove of wisdom passed down through generations that can transform the way you work with yarn. One such gem is the use of a traditional weaving loom for stability and precision. Seasoned crafters often swear by the meticulous organization of their tools, keeping needles and threads sorted by size and color in dedicated compartments.
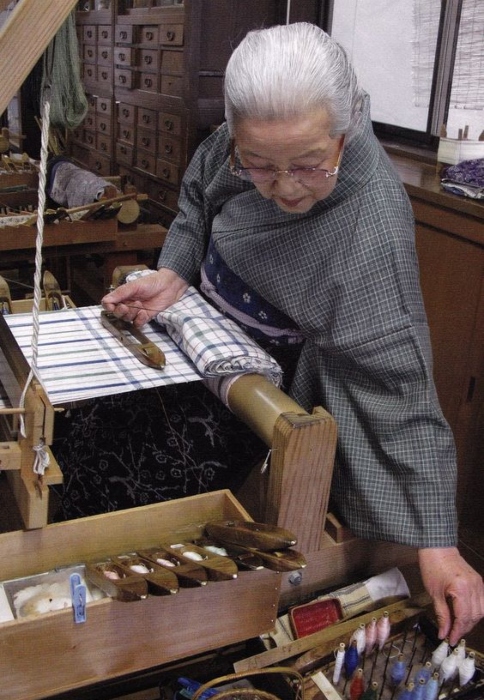
This not only saves time but also inspires a seamless workflow. Moreover, embracing the Japanese art of ‘Mottainai’, or avoiding waste, can lead to innovative repurposing of leftover materials, ensuring every scrap of yarn fulfills its creative destiny.
Pompom Flower Creation
Create vibrant woolen flowers with ease! Step 1: Wrap different colors of yarn around a cheese grater, allocating each color to its own section. Step 2: Secure one side of the yarn with a tight knot. Step 3: Cut through the loops on the other side of the grater.
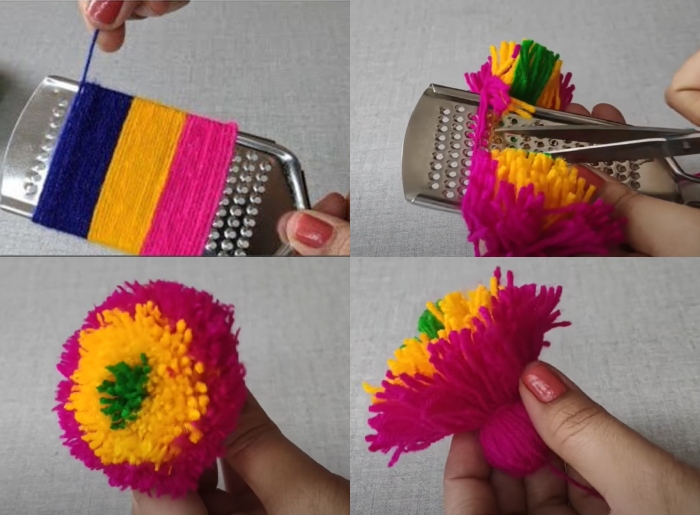
Step 4: Gather and tie the cut ends at the bottom. Step 5: Fluff out the yarn to form a flower shape. Step 6: Trim any excess yarn at the top to tidy up your pompom flower. This simple technique yields a charming, fluffy blossom perfect for brightening any space!
Easy Toilet Roll Yarn Flower Tutorial
Step 1: Begin by looping a single strand of yarn around a toilet paper roll. Step 2: With a needle, weave another length of yarn around the first strand, creating loops all around the roll. Step 3: Continue looping until you encircle the entire roll. Step 4: Secure the yarn by tying it off once the loops are in place.
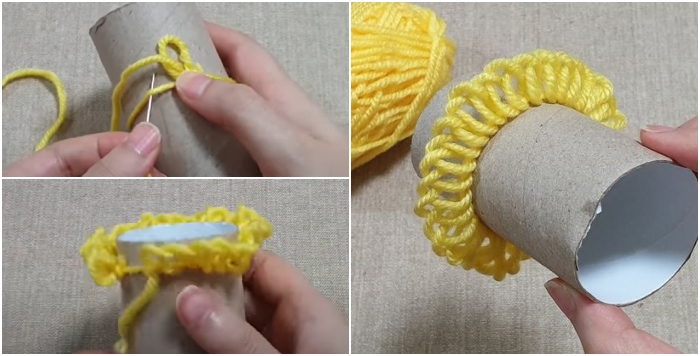
Step 5: Gently slide the completed looped yarn off the roll. The result is a perfectly round yarn flower, ready to be used in various crafts or as a delightful decoration. This method is a simple way to create uniform, circular yarn flowers with ease.
Starburst Yarn Mandala Creation
Step 1: Construct a hexagonal frame with notches around the edges to anchor the yarn. Step 2: Secure the starting yarn to a notch, stretching it across to the opposite notch, and continue wrapping to form the base structure. Step 3: Progressively layer yarn, alternating colors for visual depth, and weaving between various notches to elaborate the pattern.
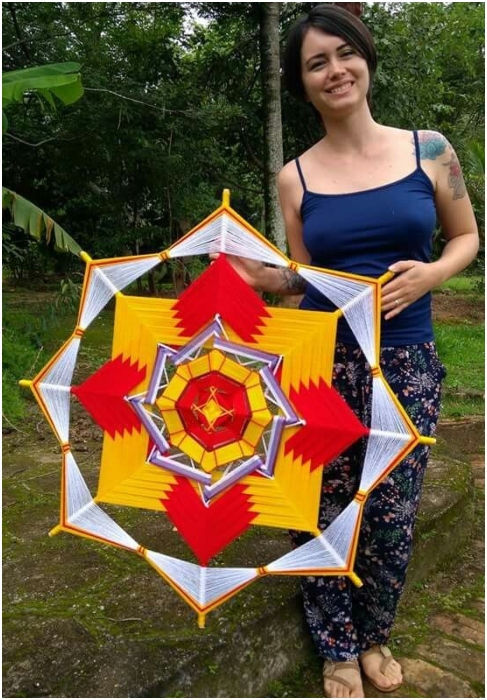
Step 4: Ensure each strand is taut and neatly secured at the notches. Step 5: Once the frame is filled, tie off the end of the yarn. Step 6: Neatly trim any excess yarn ends. This method yields a stunning starburst yarn mandala, perfect as a vibrant, eye-catching piece of wall art.
Color-Coded Efficiency
For those who delve into the world of intricate knitting projects, efficiency is key. A simple yet effective hack is to employ a wooden rack system for organizing yarn. By sorting skeins by color and winding them onto spools, you can avoid the all-too-common tangling that can turn a relaxing hobby into a source of frustration.

This method not only keeps your yarns untangled but also visibly accessible, allowing you to switch between colors with ease. The technique is especially useful for projects with multiple color changes, like personalized sports team scarves or festive holiday patterns, ensuring your knitting experience is as smooth as your stitches.
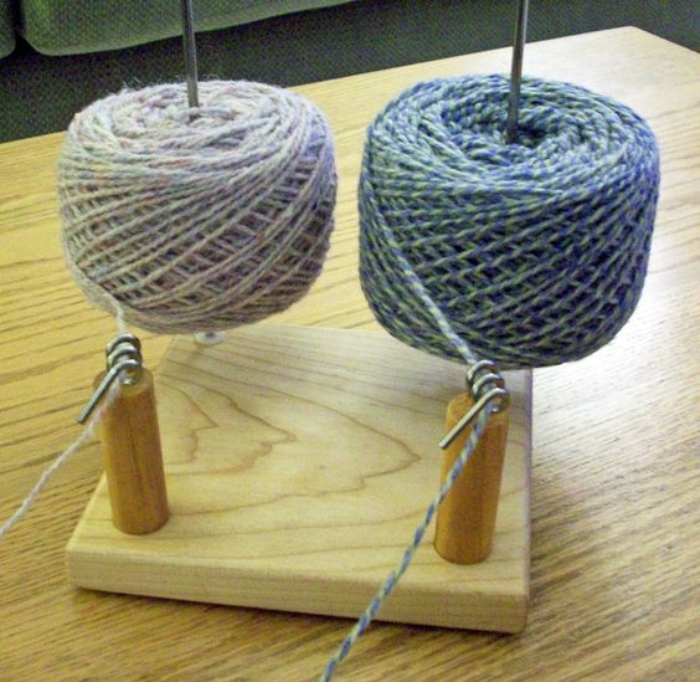
DIY Yarn Pet Duo
To craft your own Yarn Pet Duo for handling two balls of yarn with ease, gather a 7″ x 7″ Maple hardwood base that’s 13/64″ thick. Drill three holes into the base—two on adjacent corners and one in the center—to accommodate different sizes of yarn balls or cones. Insert two 12-inch rods into the corner holes for large balls or a single central rod for jumbo cones.
DIY Circular Loom Knitting
For a fun and creative DIY project, try making a pair of cozy leg warmers using a circular loom. Begin by selecting a yarn color of your choice and a circular loom with pegs. To start, secure your yarn and wrap it around each peg in a clockwise direction, creating a foundation row. After the initial wrap, loop the yarn over each peg again to form your second row, and use a loom pick to pull the bottom loop over the top loop and off the peg, continuing around the loom.
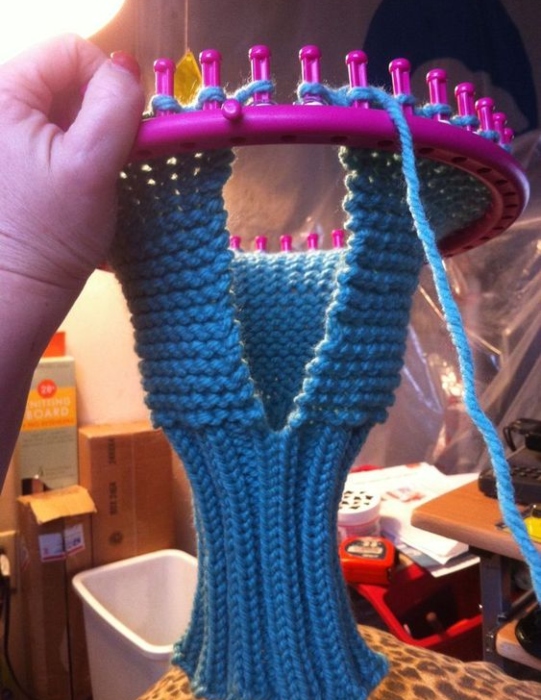
As your fabric grows, ensure consistent tension for even stitches. When you reach the desired length, cast off the final row to secure your knit. This method is not only efficient but also allows for a seamless knit, perfect for warm and stylish leg warmers.
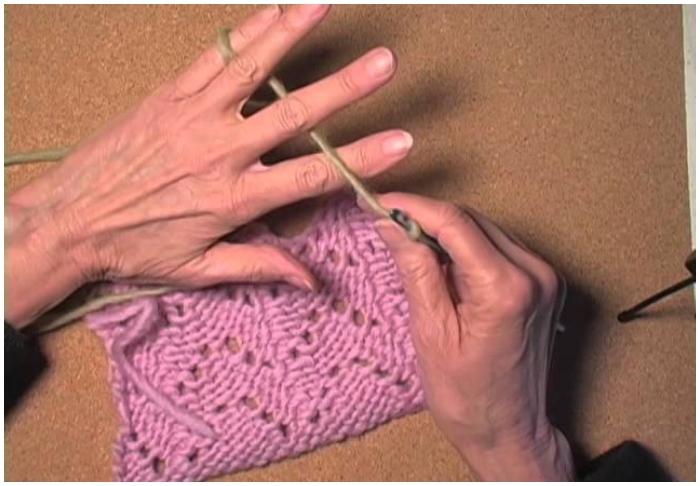
Fixing a Snag with a Double-Pointed Needle
If you’ve encountered a snag in your knitting, don’t worry—here’s a simple way to fix it and get your project back on track. First, you’ll need a double-pointed needle, preferably one that matches the size of your knitting needles. Gently insert the double-pointed needle into the snagged loop from the wrong side of the fabric.
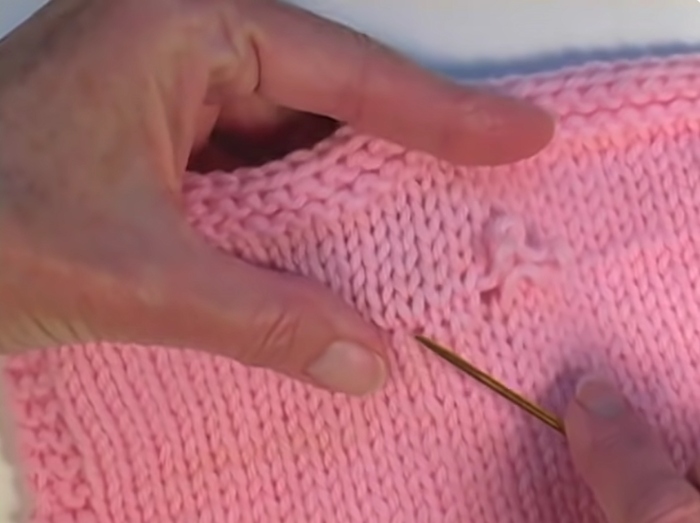
Carefully pull the loop back through to the right side, reversing the direction of the snag. Once the loop is on the correct side, use the needle to adjust the tension, pulling the stitch back to its normal size. This method realigns the yarn and restores the smooth texture of your knitted piece. With a bit of patience, your knitting will look as good as new!
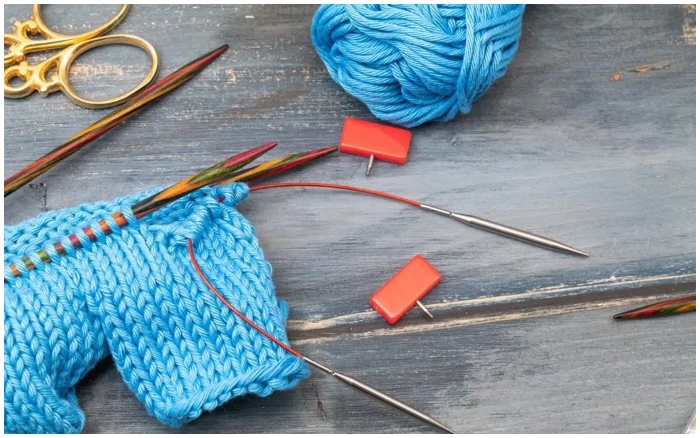
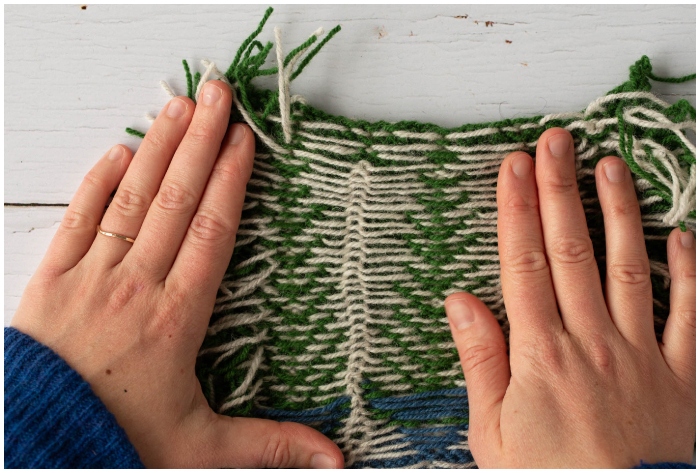
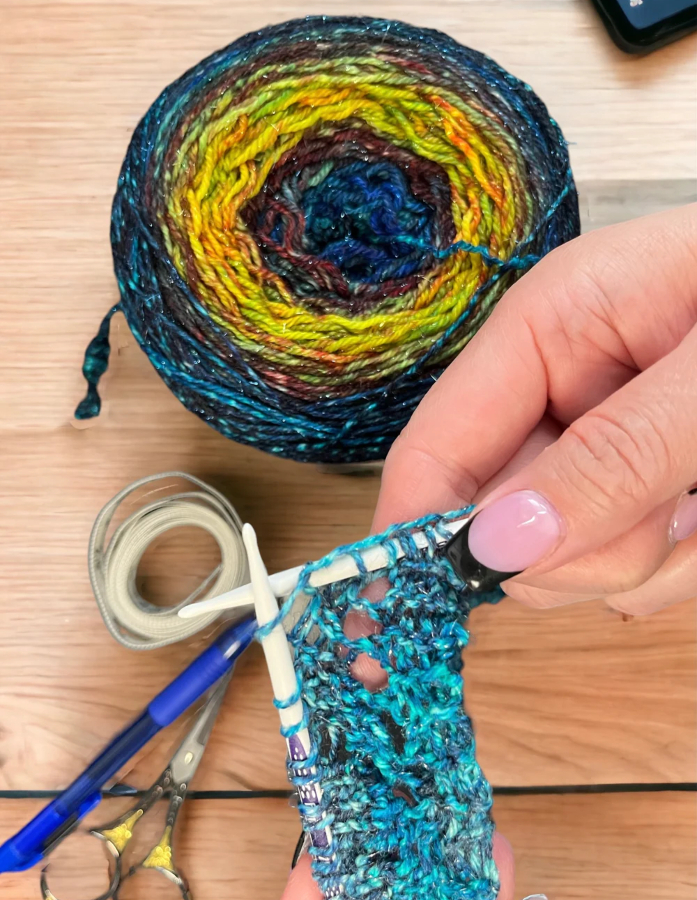
On-the-Go Knitting
Knitting isn’t confined to the comfort of your home; it’s a versatile craft you can take anywhere. To knit on the go, start with a portable project like a cozy beanie or a pair of mittens. Choose lightweight needles and a yarn that won’t tangle easily. Keep your yarn secure in a bag to prevent it from rolling away.

As you knit, maintain an even tension, and periodically count your stitches to ensure consistency. If you’re using a pattern with color changes, like the striking stripes shown here, keep the yarns organized and switch colors cleanly to avoid loose ends. With these tips, you can turn any waiting time into a productive knitting session, creating beautiful, handcrafted items wherever you are.
DIY Granny Square Pouch
Discover the joy of making a vibrant granny square pouch, perfect for holding your essentials. Begin with selecting various colors of yarn to create the small, classic granny squares that will form the body of the pouch. Work each square individually, starting from the center and building outward in rounds.
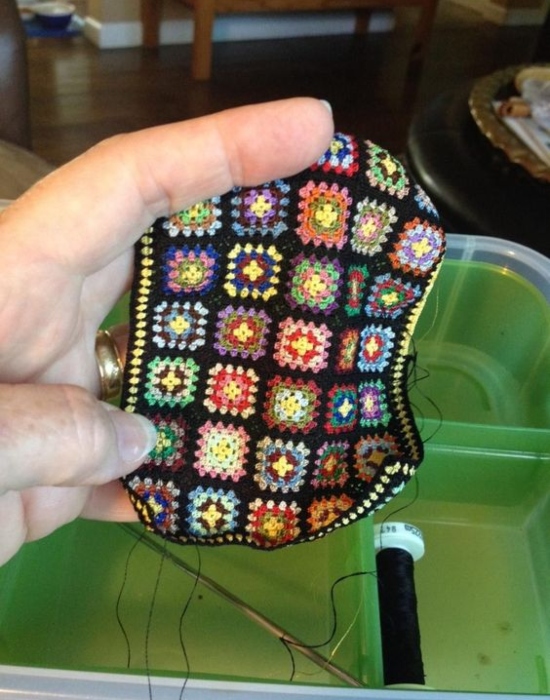
Once you have enough squares, join them using a slip stitch or a single crochet seam for a flat, neat finish. For the lining, cut a fabric piece to the size of the assembled squares and sew it in, adding a zipper for closure. With the granny square technique, you can mix and match colors to design a personalized, colorful pouch that’s as unique as your crafting skills.
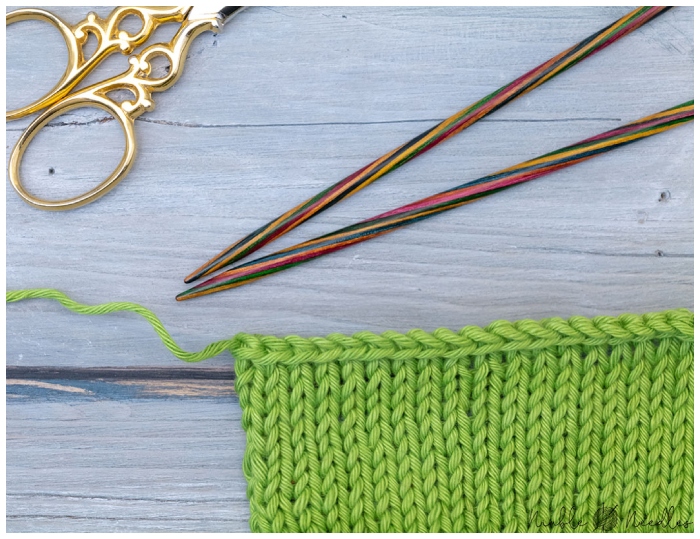
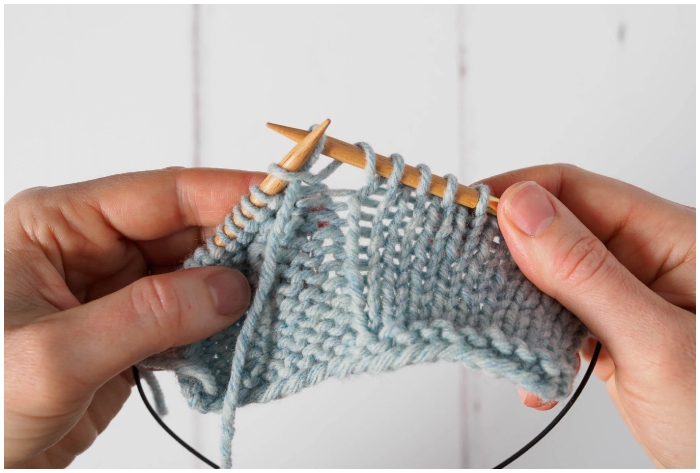
Knit with a Different Needle Size on Each End
Revolutionize your knitting in the round with this ingenious trick! Using a smaller needle on the left end of your circular needles makes it effortlessly easier to slide stitches off. This approach is handy for magic loop techniques, as the left needle mainly serves as a holder.
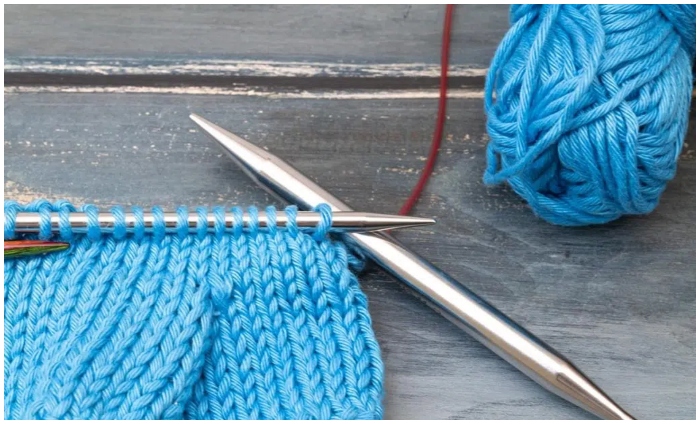
Plus, it won’t affect your gauge since the right-hand needle determines your stitch size. Bonus tip: This hack is a lifesaver when juggling two projects requiring the same needle size – no need to switch back and forth!
Colander Yarn Bowl
A colander can be transformed into a practical yarn bowl, particularly useful when working with multiple yarns or mini skeins. The holes in the colander prevent yarns from tangling and make it easy to draw out the strands as needed.
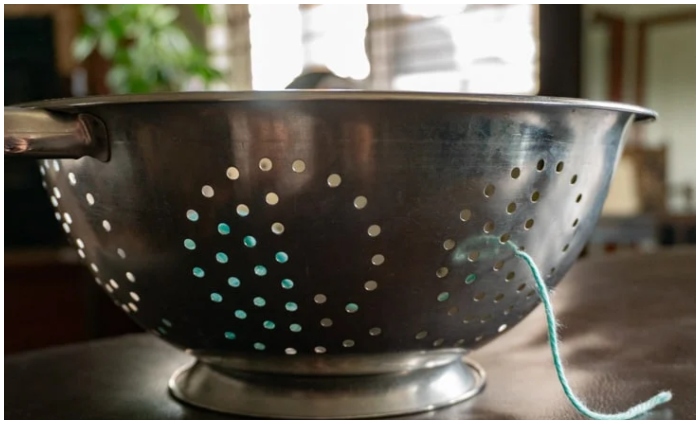
This solution is convenient for knitters and crocheters who juggle multiple colors or types of yarn in a single project. When choosing a colander, opt for one with smooth edges to avoid snagging the yarn, ensuring a smooth crafting experience.
Fix Your Purl Tension
Struggling with uneven purl stitches can be a common frustration, particularly in the flat knitting of stockinette stitch. To combat this, a nifty trick involves using a smaller needle size on one end of your circular needles.
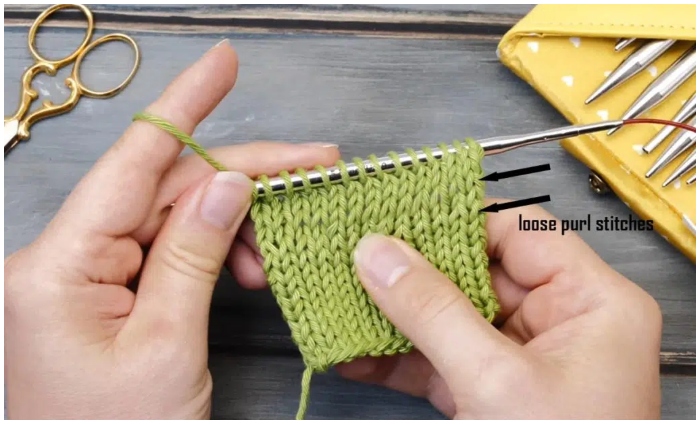
This adjustment ensures tighter, more consistent purl stitches, enhancing your work’s overall texture and appearance. It’s a simple yet effective solution that can dramatically improve your knitting quality, especially for those intricate patterns where every stitch counts.
Use Filler Rope to Avoid Fold Lines When Blocking
Blocking tubular knitted items like hats, sweaters, or socks often leads to the dilemma of unwanted fold lines. The solution lies in a surprising tool: filler rope, typically used in home caulking. Wrapping the edges of your knitted piece with this rope during blocking prevents the formation of creases, ensuring a smooth, professional finish.
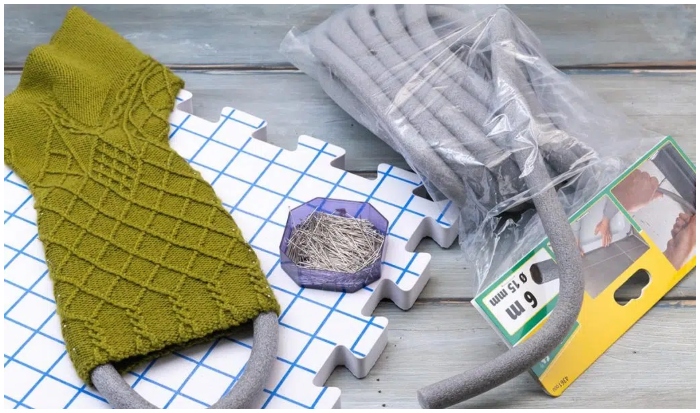
This method is beneficial when you don’t have access to specialized blocking boards, offering a cost-effective and readily available alternative.
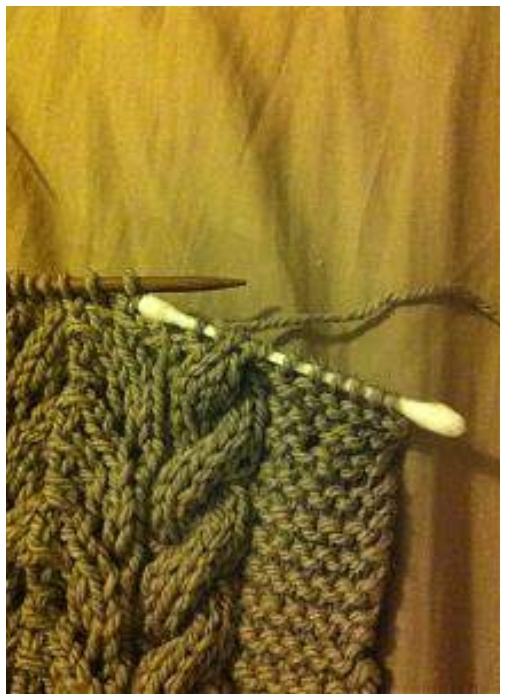
Use Eyelets and Knots to Keep Track of Your Needle Size
Keep track of the needle sizes used in your projects with a creative twist. Adding eyelets in the first row of your knitting can be a visual and practical way to remember the needle size used. Each eyelet represents a different needle size, and for half sizes, incorporate purl stitches.
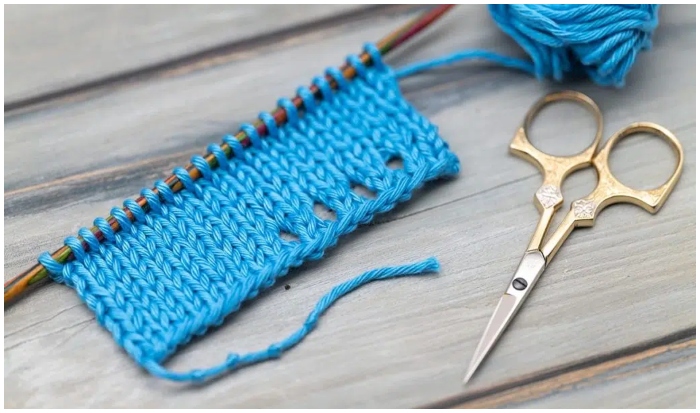
This technique is invaluable when you’re experimenting with multiple gauge swatches. Additionally, tying knots in the tail of your cast-on can serve as a quick reference for the needle size, particularly useful if you need to pause a project and come back to it later.
Yarn Holder from a Plastic Pop Bottle
Creating a yarn holder from a plastic pop bottle is a clever and simple knitting hack that requires minimal materials. You’ll need just two items: a clear plastic pop bottle and a pair of sturdy scissors. First, wash the empty pop bottle with soap and water and let it dry. Then, cut an oval-shaped hole into one side of the bottle, ensuring it’s large enough to fit a skein of yarn but not so large that the yarn falls out.

Wristlet Doodad Holder
This knitting project, ideal for intermediate knitters, offers two versions of a stylish wristlet doodad holder. The main materials include a small amount of Cascade 220 gold yarn (MC) and optional green (Waste 1) and pink (Waste 2) yarns for Version 2. You’ll also need size 6 needles, a yarn needle, and a cable needle. The gauge is not critical for this project.
DIY Popsicle Stick Spool Knit Infinity Scarf
This DIY Infinity Scarf project transforms traditional knitting into an innovative craft using a homemade popsicle stick spool knitter. The scarf, an evolution from a previous summer skinny scarf design, incorporates a fusion of three distinct yarns and a variety of stripe patterns. To create the knitter, 15 short popsicle sticks are affixed to a rigid plastic Vitamin Water bottle using duct tape, offering a durable base for the knitting process. While challenging to cut, the bottle provides a sturdy alternative to traditional methods, with options like cardboard tubes or embroidery hoops serving as simpler alternatives.
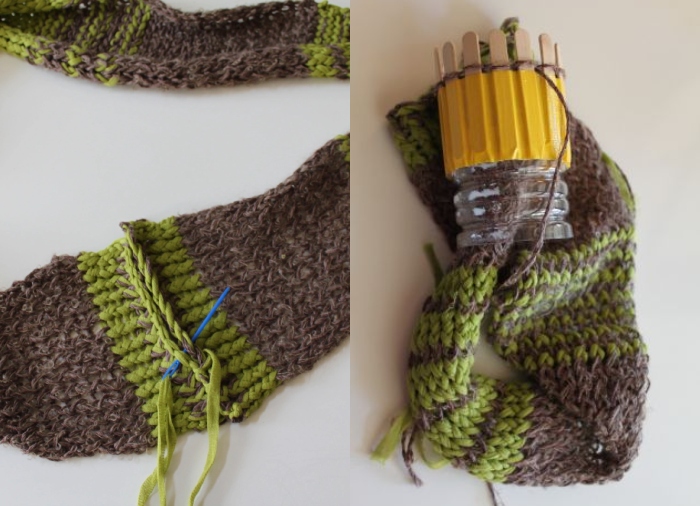
The scarf’s unique appeal lies in its adventurous yarn selection, featuring Italian cotton (brown), South African lace-weight baby mohair (light brown), and a Spanish cotton, linen, and rayon blend (green). The knitting technique is similar to that of the skinny scarf, with the final piece measuring approximately 60 inches. The pattern includes stretches of brown interspersed with green stripes, creating an eye-catching design.
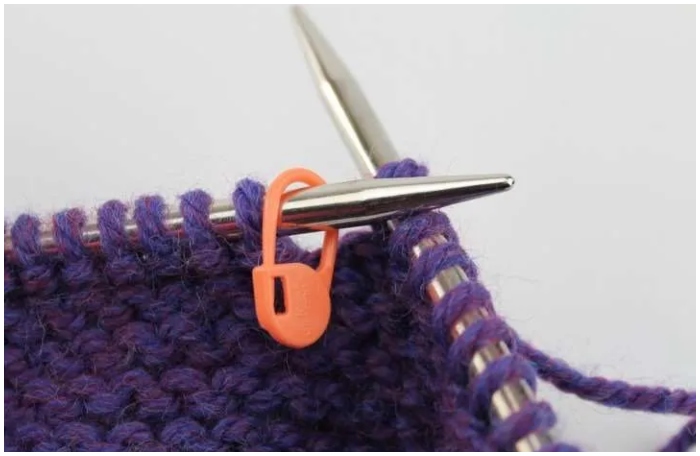
Organize Your Connectors and Pins with Stitch Markers
Managing interchangeable knitting needle sets’ small but crucial accessories can be challenging. A simple yet effective solution is to use bulb-shaped stitch markers as organizers for connectors, adaptors, and pins, ensuring they’re always at hand and never lost.
If some components don’t have holes to attach the markers, a small, sewn-in pin cushion in your needle case can be a lifesaver. Stick the keys and other tiny tools into it for easy and organized storage.
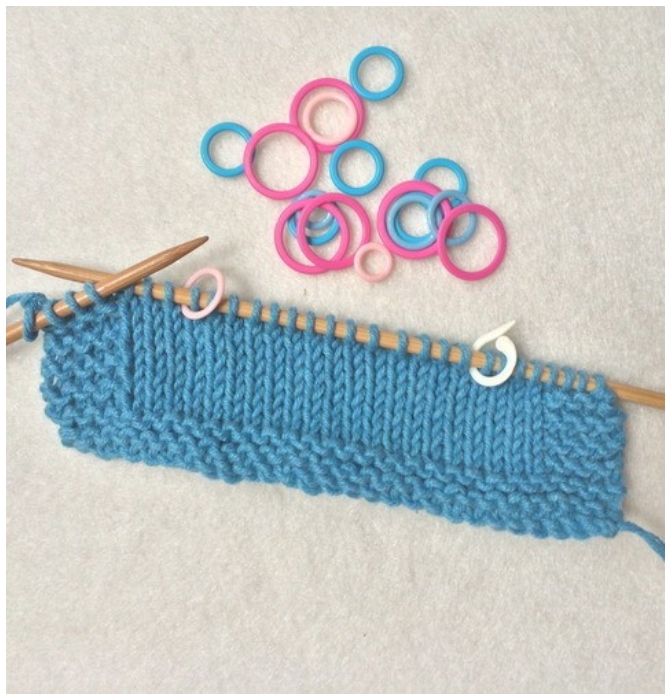
Use Stitch Markers to Keep Track of Your Progress
Keeping accurate count in large knitting projects can be daunting. A practical and efficient way to maintain correct stitch counts is by placing stitch markers at regular intervals – for example, every 20 stitches.
This approach drastically reduces the need for frequent counting, particularly beneficial in complex patterns or when working with many stitches. It’s a straightforward strategy that can make tackling even the most ambitious knitting projects more manageable and enjoyable.
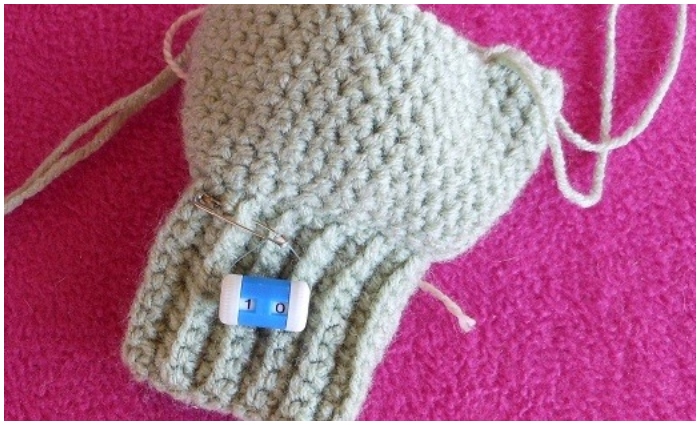
Mini Needles as Stitch Holders for Tubular Projects
Switching to mini needles as stitch holders can be a game changer when knitting gloves, mittens, or other small tubular items. This method allows you to smoothly slip stitches onto a short cable secured with cable stoppers. At the same time, you continue knitting other parts of your project.
When ready to revisit those stitches, repeat the tips and knit as usual. This hack saves time and keeps your stitches safe and easily accessible.
Securing Loose Ends with Hair Clips
Managing half-used skeins or yarn cakes can be challenging for knitters with extensive yarn collections. Using old hair clips to secure the loose ends is an ingenious solution.
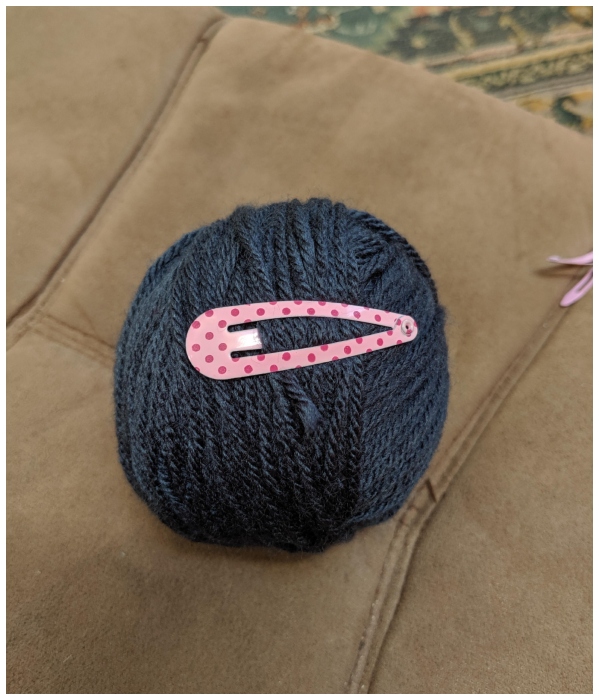
It prevents unraveling and keeps your stash organized. Moreover, these clips can hold your cast-on tail, especially when it needs to be longer for sewing purposes, keeping it neatly out of the way as you knit.
Organize Circular Needles Using a Binder/Photo Album
Instead of investing in specialized needle cases, repurpose a standard binder or photo album for a cost-effective and organized storage solution.
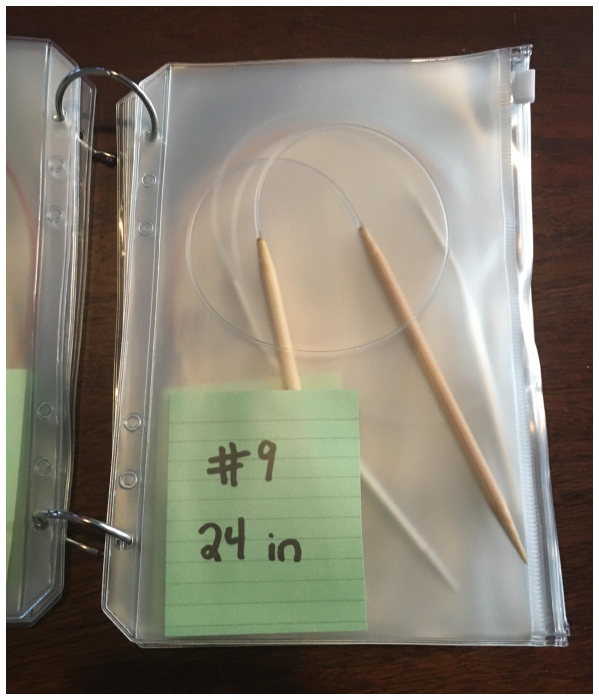
Each circular needle can be stored on a clear sheet, and you can use a sharpie to mark the needle sizes or add organizers for easy identification. This economical and highly practical method ensures your needles are always organized and easy to find.
Neaten the Last Stitch of a Bind Off
To avoid the unsightly ‘ear’ often formed by the last stitch in a bind-off, try this refined technique:
1. Slip the last stitch to your right needle without knitting it.
2. Pick up the back loop of the stitch one row below and lift it onto your knitting needle.
3. Slip both stitches back into the left needle and knit them together.
4. Finally, bind off the remaining stitches as usual.
5. This method results in a neater, more uniform edge.
A Better Way to SSK (Slip, Slip, Knit)
For a left-leaning decrease, the traditional SSK method can be improved with these simple steps:
1. Knit the SSK as usual, but do so at the very tip of the needles, avoiding overstretching the stitches.

2. On the return round (or in the next round if knitting in the round), instead of purling the SSK, purl it through the back loop.
3. This adjustment creates a neater, tighter stitch that enhances the overall look of your knitting.
Improving the Cast-On Edge
Too Tight Edges: To avoid a tight cast-on edge, especially in stretchy patterns like a 2×2 rib, use the long-tail cast-on method around two needles or one needle of a larger size. After casting on, remove the second needle and start knitting. The first row might look slightly irregular but will even out and provide a more flexible edge.
Avoiding Slip Knots in Circular Knitting: Starting a cast-on with a slip knot can be conspicuous in circular knitting. Instead, begin with a simple twisted loop for a more seamless start. This technique minimizes the visibility of the starting point, which is especially important in projects where continuity and symmetry are crucial.
Mastering the Art of Correcting Twisted Stitches
Twisted stitches can be a common issue in knitting, often resulting from picking up dropped stitches incorrectly or mishandling stitches during unraveling. To rectify this, gently twist the stitch into its correct position using your fingers or needles.
A more straightforward approach is to knit the twisted stitch through the back loop, instantly correcting its orientation. This technique ensures that your stitch pattern remains uniform and aesthetically pleasing without disrupting your knitting flow.
Efficiently Fixing Stitches Without a Crochet Hook
For minor dropped stitches, you can swiftly recover them using your knitting needles, a handy solution when a crochet hook isn’t available.
1. Carefully pick up the dropped stitch with your left needle.
2. Adjust the strand to the back or front, depending on whether it’s a knit or purl stitch.
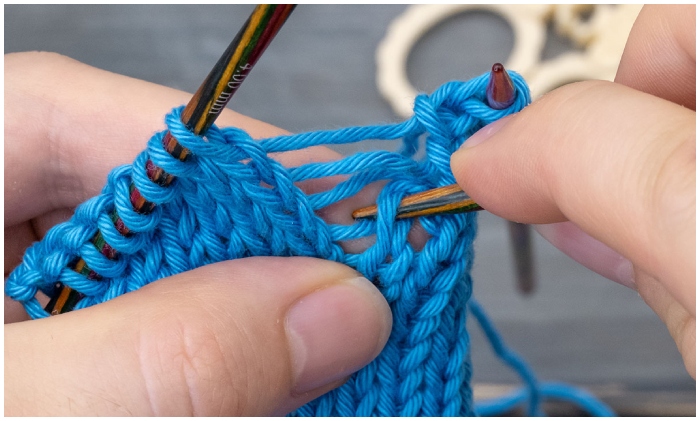
3. deftly pull the strand through the stitch with your right needle.
4. Return the stitch to the left needle, maintaining its correct orientation.
5. This method provides a quick fix for small errors, ensuring your knitting project remains on track without needing additional tools.
Avoiding Complex Stitches by Knitting in the Other Direction
Some stitches can be challenging to execute, especially in lengthy sequences. A clever workaround in circular knitting is to knit from the wrong side for specific sections. This tactic is handy for avoiding numerous rows of complex purl stitches.
You can significantly simplify the process by turning your work around and knitting these rows. It’s essential to slip the first stitch of the new round and consider using a short-row technique to prevent gaps, ensuring a smooth and seamless transition in your work.
Addressing Ladders and Loose Stitches Post-Knitting
When you notice loose stitches or ladders after knitting, they can be corrected with some finesse.
1. Tighten the affected stitch by pulling on it with your needle.
2. Gradually distribute the excess yarn to the adjacent stitches, maintaining even tension throughout.
3. A similar approach can be applied to ladders, where you redistribute the excess yarn along the column of stitches, thereby eliminating the ladder effect. This method is particularly effective for ensuring your finished project’s polished and uniform appearance.
Grafting the Last Stitch for a Flawless Bind-Off Edge
A simple grafting technique can be employed to seamlessly close the gap at the bind-off edge in circular knitting projects.
1. Thread the tail onto a tapestry needle.
2. Skillfully go underneath the V of the first bind-off stitch from below, then through the V of the last bind-off stitch from above.
3. Neatly tuck the tail on the wrong side.
4. This technique creates an invisible and smooth transition at the bind-off edge, enhancing your knitting project’s overall look and professionalism.
Perfecting End Weaving with a Sharp Tapestry Needle
The final step in any knitting project is to securely and invisibly weave in the ends. Using a sharp tapestry needle instead of a blunt one allows for more precise and secure weaving.
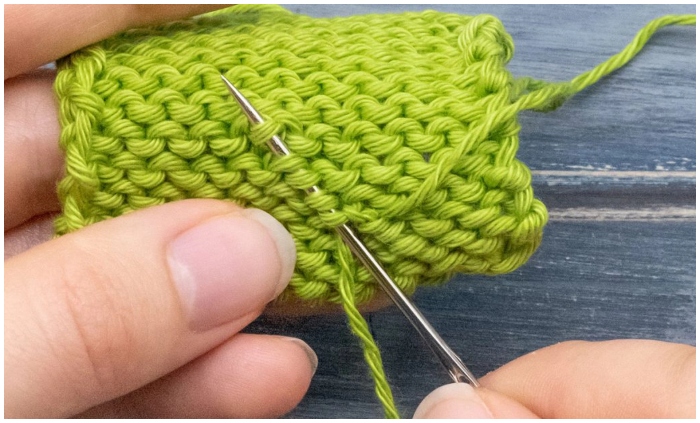
1. The sharp needle lets you pierce through yarn strands rather than simply looping around them.
2. This method creates a stronger, more integrated weave, ensuring the ends stay put and remain invisible.
3. Ensuring a neat and secure finish is crucial in preserving the beauty and integrity of your knitted items; this technique is key to achieving that.
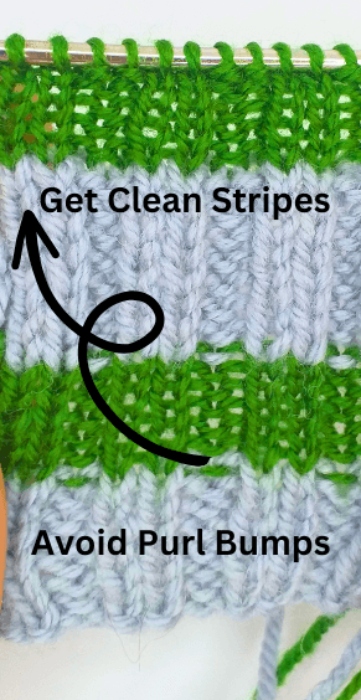
Seamless Color Transitions in Ribbing: Eliminating Purl Bumps
To achieve a smooth transition in ribbing without the unsightly ‘purl bumps’ that often accompany color changes, there’s a simple yet effective technique. When introducing a new color in your ribbing, begin by knitting the entire first row. This approach ensures that on the right side of the work, the knit row remains inconspicuous and seamlessly integrates the new color. This method is particularly effective in garments where a distinct right and wrong side is considered, such as hats, socks, and sweaters.
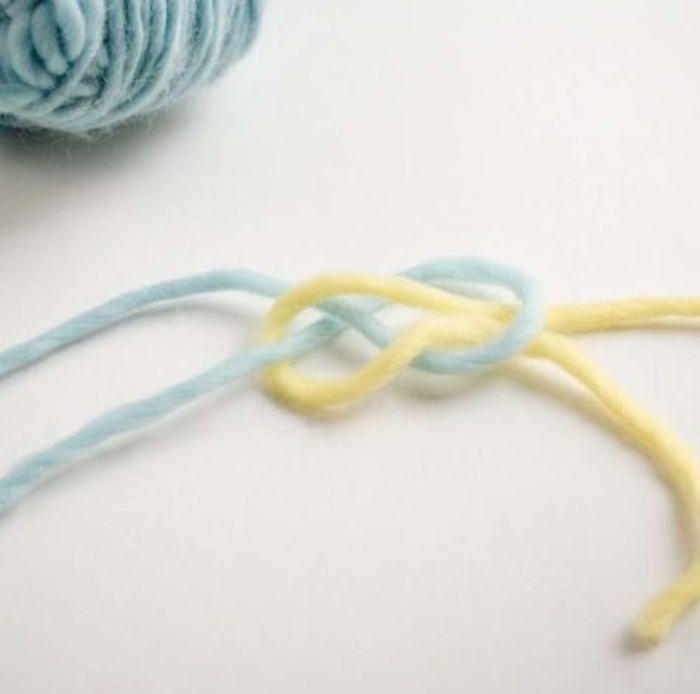
Mastering the Weaver’s Knot
One common challenge for knitters is joining new yarn balls without unsightly knots that disrupt the smoothness of their projects. The We Are Knitters blog offers various solutions for this, and today, we introduce the “weaver’s knot” – a technique that promises an almost invisible join. This method is particularly effective when the same color yarn is used, as it blends seamlessly into your knitting.
Neat Ribbing in Knitting
Achieving neat rib stitches in knitting can significantly enhance the appearance of your project. One effective method is to adjust your tension; give an extra tug to the yarn when transitioning from a knit to a purl stitch. This simple adjustment can significantly reduce slack between stitches. Another technique is to knit or purl through the back loop, creating a tighter and more defined rib. This method shortens the yarn path between stitches, resulting in a neater appearance, especially when using yarns with varied textures or thicknesses.
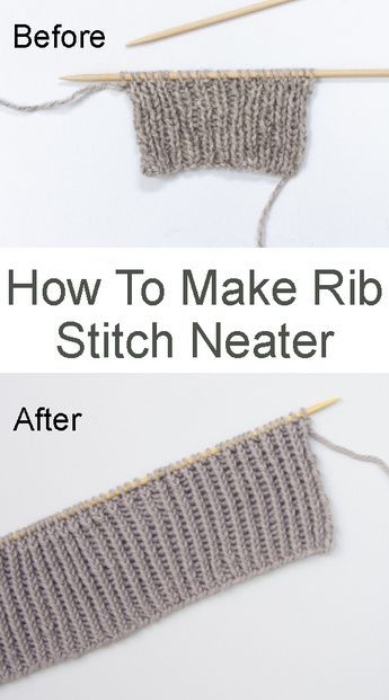
For more challenging yarn types, slipping stitches can be a game-changer. By slipping the last knit stitch and fixing it in the next row, you create a tighter fabric with fewer loose stitches. While this technique may not be suitable for larger projects, it’s perfect for smaller sections like cuffs or ribbing in the round. Combining these strategies can lead to a noticeable improvement in your ribbing, giving your knitting projects a polished and professional look.
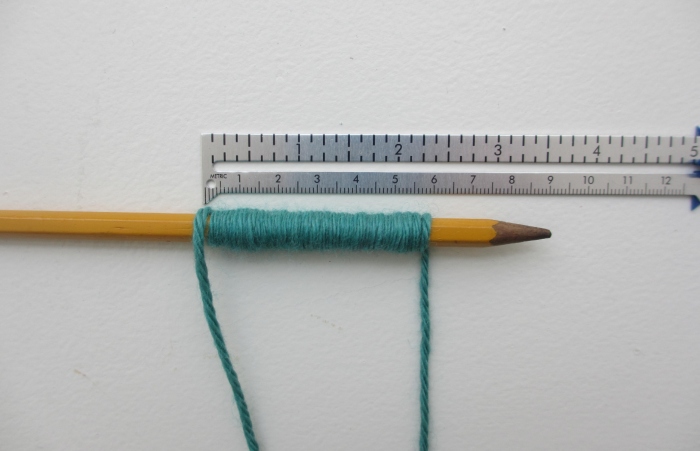
Deciphering Yarn Weights with WPI
Organizing yarn can be a challenge, especially when dealing with inherited or unlabeled skeins. To determine yarn weights accurately, a simple technique called Wraps Per Inch (WPI) is invaluable. You’ll need the yarn in question, a ruler, and an object with a consistent circumference like a pencil. Alternatively, you can wrap the yarn directly around a ruler or use a specialized WPI tool with notches for precise wrapping and a guide for categorization.
Mastering Weaving in Ends
Weaving in ends in knitting might seem straightforward, but ensuring they remain invisible and secure requires technique. Two methods can help achieve this: weaving in one direction, then reversing for a few stitches to anchor the tail, and sometimes splitting the yarn of the stitches for added security. For pieces with a seam, weave the ends into the seam allowance.

If there’s no seam allowance, weave the tail into the fabric, following the yarn’s direction to prevent holes. Apply enough tension to keep the join invisible from the right side without puckering the fabric. When weaving in ends in solid areas, go diagonally for better concealment. If multiple tails are near the same spot, weave them in different directions to avoid thickening the fabric too much.
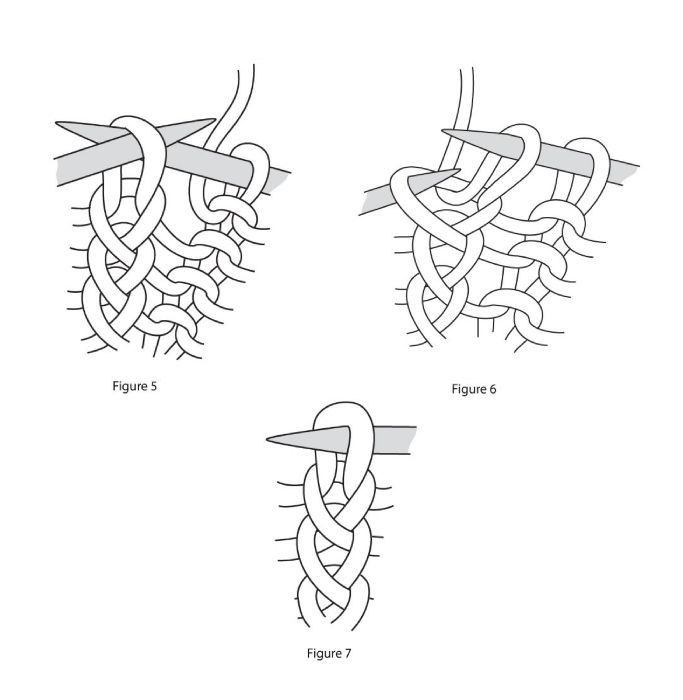
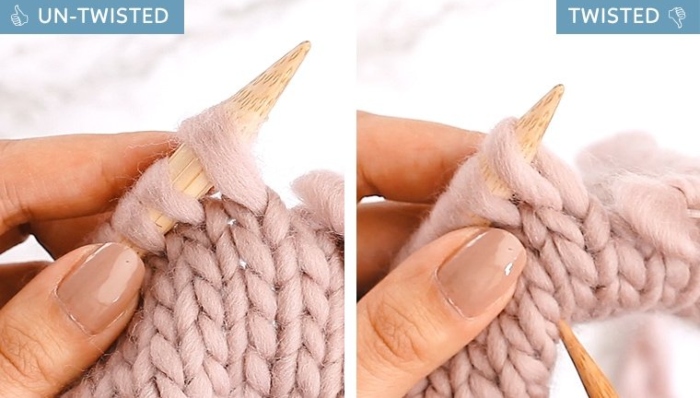
The Art of Unraveling Knitting
Unraveling knitting is a necessary skill for correcting mistakes, but doing it right is crucial to avoid further complications. The first step in unraveling is ensuring that the stitches are not twisted when placed back on the needle. A twisted stitch occurs when the left leg of the stitch is on the front of the needle instead of the right leg. To fix this, simply turn the stitch around so that the right leg is in front.
There are several methods for unraveling knitting effectively. Method 1 is ideal for unraveling a few stitches. It involves using the left needle to pick up the stitch below the one you’re unraveling, then carefully dropping the stitch from the right needle and pulling the working yarn to unravel it. Method 2, although popular, can be inefficient and risky. It involves pulling the working yarn to unravel rows quickly, which may lead to dropped stitches and requires careful repositioning on the needle, ensuring they aren’t twisted. The preferred method, Method 3, is safe, precise, and quick, as it ensures stitches are un-twisted before unraveling and allows you to decide in advance the point at which to stop.
Toilet Paper Stand Yarn Holder
Transforming a common household item into a practical craft tool, a DIY yarn holder made from a toilet paper stand is a creative solution to manage yarn during knitting or crocheting projects. Cher, from The Craft Alternative, ingeniously repurposed a toilet paper holder, which she acquired during a house renovation.
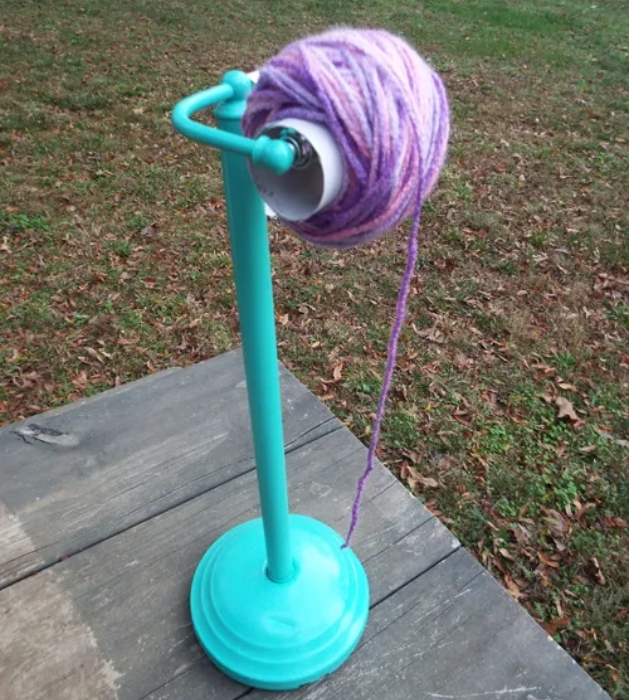
This yarn holder keeps yarn clean, off the floor, and safe from playful pets. The clever adaptation involves using a yarn winder to wrap the yarn around an empty cardboard toilet paper roll, which is then placed on the stand. This setup allows for the smooth dispensing of yarn, enhancing efficiency and organization in crafting projects.
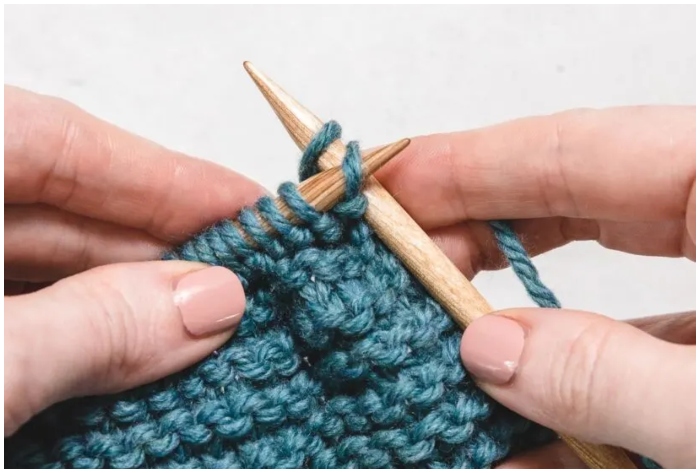
Two-Needle Cable Cast-On
The Two-Needle Cable Cast-On is a robust method to start a knitting project. It’s ideal for items where you need a firm and non-stretchy edge, such as the collars and cuffs of sweaters. This method creates a neat edge that resembles a cable and is presentable on both the front and back sides of the work.
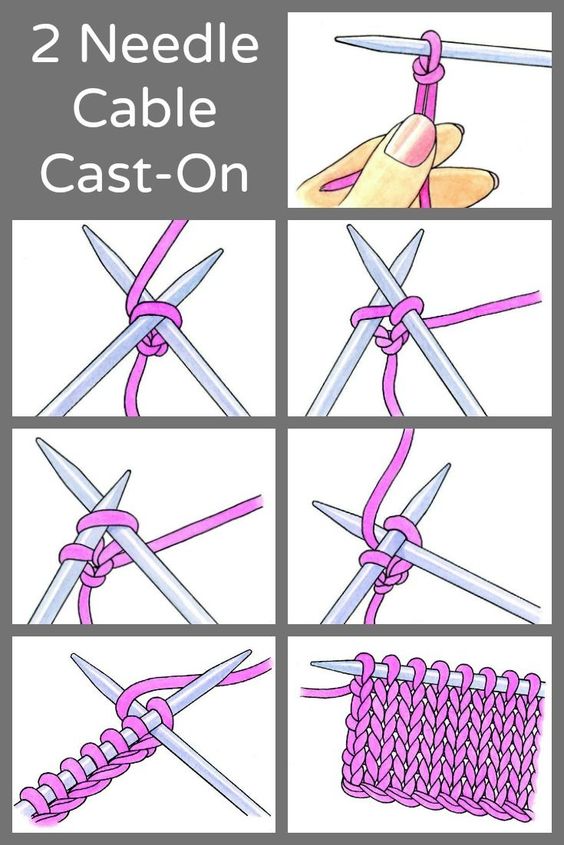
It’s easy for beginners and is perfect for projects like beanies, classic blankets, and simple scarves, except when a stretchy edge is required.
Tubular Cast-On
The Tubular Cast-On provides a professional, stretchy edge, making it excellent for items like socks, mittens, gloves, and hats. It is especially suitable for k1 p1 ribbing, mimicking the ribbed pattern’s elasticity and rounded edge.
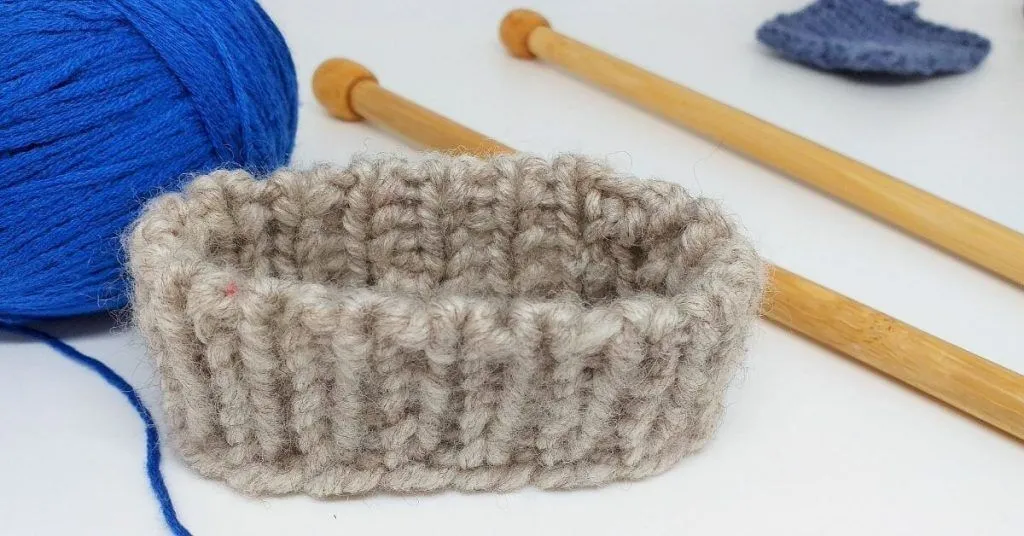
This technique creates a rolled edge that looks seamless and neat, perfect for edges that might be exposed when the brim of a hat is folded up. Despite being slightly more complex, the Tubular Cast-On is worth the effort for its polished finish.
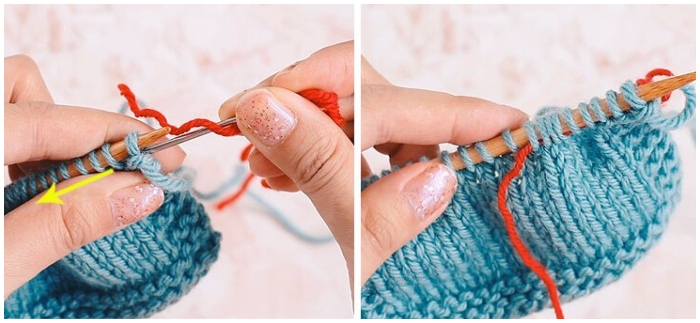
Joining Yarn by Holding Tail and Working Yarn Together
When adding a new ball of yarn, a simple method is to knit a few stitches with the tail end of the old yarn and the new yarn held together. This technique ensures that the join is almost invisible and will be secure after blocking.
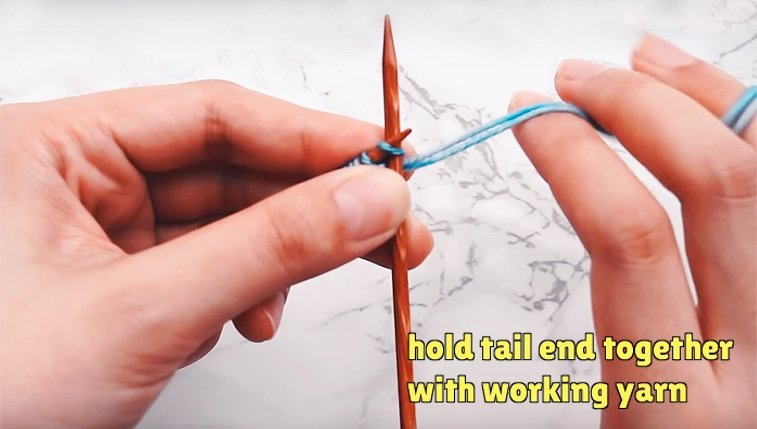
The key is to correctly align the old and new yarns to prevent any stitches from being backward and visible in the final product. This method is beneficial for projects where you want a near-invisible join and is considered a basic yet effective technique for knitters of all levels.
Managing Yarn Tension
A critical aspect of knitting is maintaining consistent yarn tension. One method to help with this is using gravity by placing the yarn in a basket at your feet. Yarn bowls are also beneficial; they add slight drag to the yarn, aiding in tension control.
Wrapping the yarn around your fingers in a specific way can also help maintain even tension, preventing the yarn from becoming too tight or too loose as you knit. Find a comfortable hand position that allows the yarn to flow smoothly and keep a steady rhythm to avoid uneven stitches.
DIY Yarn Holder
DIY solutions for yarn management can be both creative and practical. For instance, repurposing a storage basket with handles or using an empty iced beverage container with a straw hole can serve as an effective yarn bowl.
These DIY yarn holders can prevent the yarn from tangling and rolling away as you work. The key is to create a setup where the yarn can be easily accessed and remains clean, enhancing the knitting experience and ensuring the quality of your project.
Plastic Bottle Yarn Guide
A homemade yarn guide can be easily crafted from an old plastic bottle, providing a cost-effective and eco-friendly solution to manage your yarn. The process involves finding a suitable bottle, cutting the bottom off while leaving a small part attached, inserting the yarn, and securing the cut part with tape.

This makeshift yarn holder keeps the yarn clean, prevents tangles, and can be reused with different skeins, thus contributing to a more organized and efficient knitting process. It’s a clever hack that also contributes to reducing waste by repurposing plastic bottles.
Hand-Winding Yarn
The image shows a hand-winding method, a useful technique for creating a ball of yarn without the need for any tools. To hand-wind yarn into a ball, wrap the yarn around two or three fingers, carefully remove it, and continue winding the yarn around the newly formed bundle.
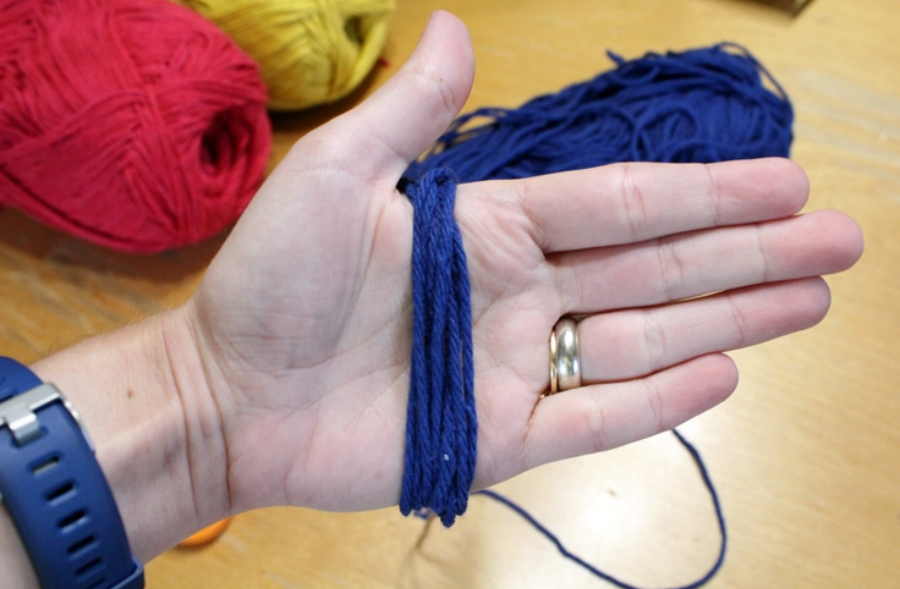
This method is perfect for organizing loose yarn and preventing it from tangling while you knit.
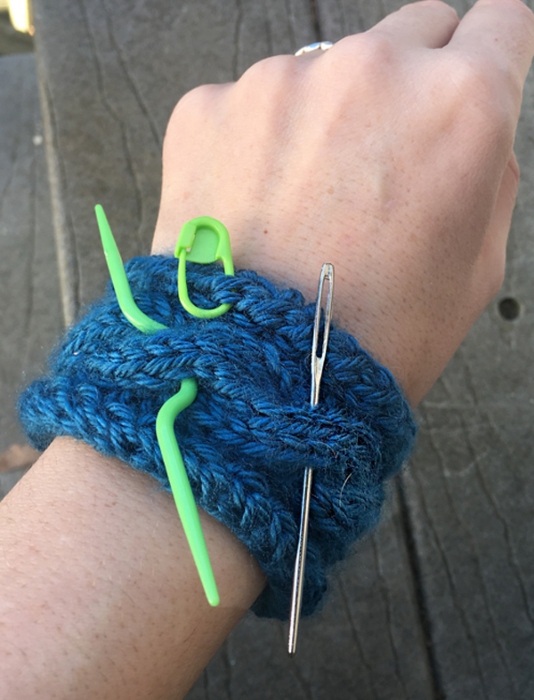
A Tapestry Needle Will Work as a Cable Needle
This tip suggests a clever knitting hack that involves using a tapestry needle as a makeshift cable needle. This can be particularly useful when you’re in a situation where you don’t have a traditional cable needle at hand. As shown in the image, slipping the tapestry needle through the band of a wristwatch or bracelet keeps the needle secure and within easy reach while you work on your cable knitting.
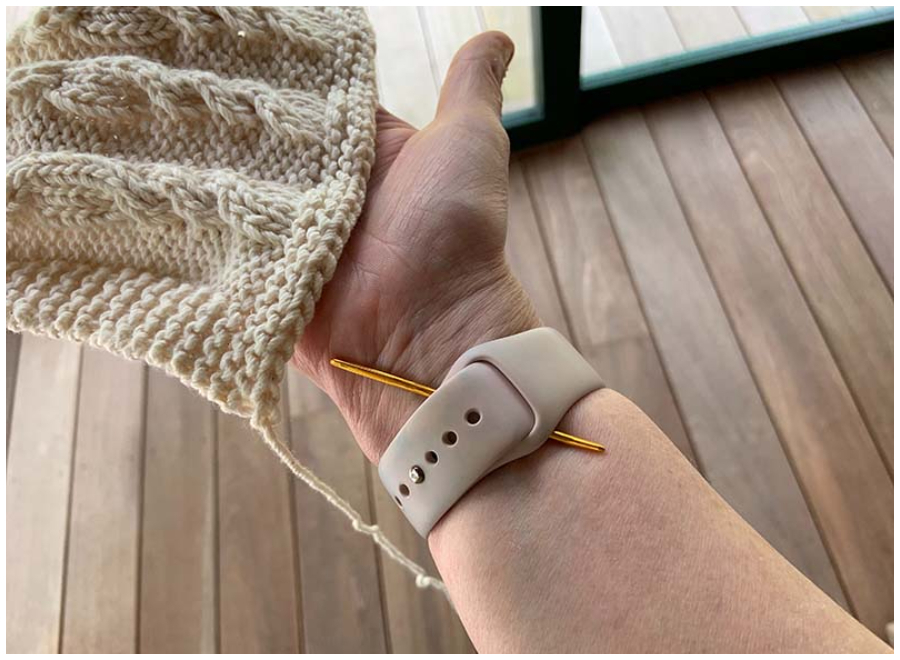
This ensures that your tapestry needle is always ready for use and frees up your hands, allowing you to knit more efficiently. This trick turns your everyday wear into a convenient knitting tool, showcasing the resourcefulness that is often a hallmark of crafting.
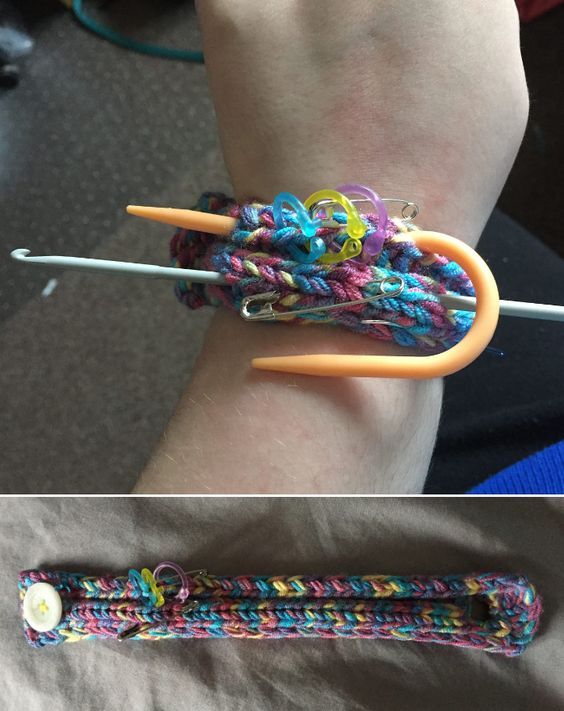
Stitch Marker Holder
This image illustrates a knitted wristband that doubles as a holder for stitch markers and a needle. This can be an excellent way to keep stitch markers handy, especially when working on small projects that require frequent changes or adjustments.
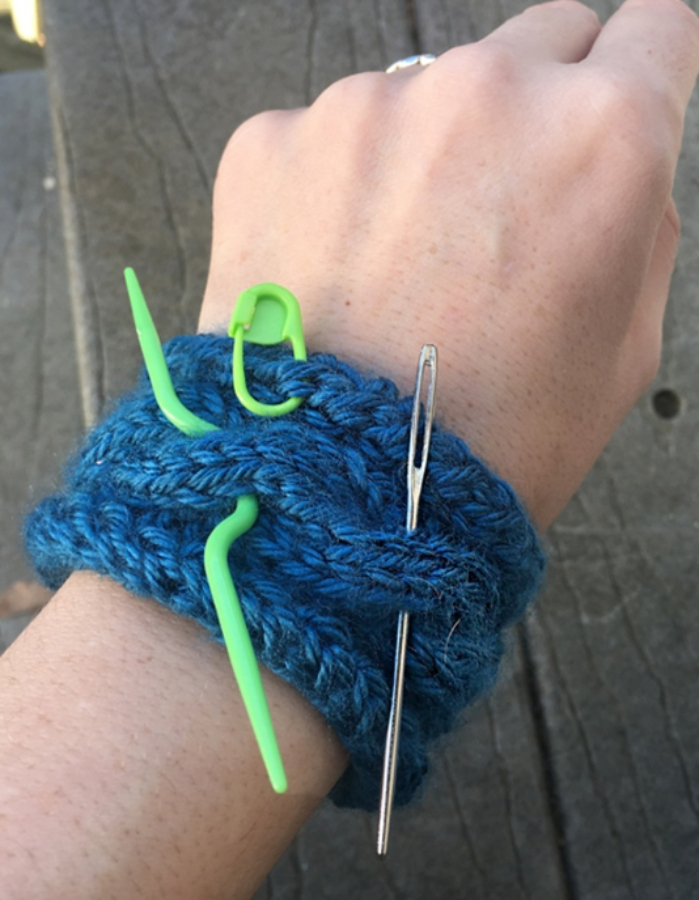
Using a wristband with clasps or loops, you can conveniently store and access stitch markers and needles without searching through your knitting bag.